Fixed: Failed to format the selected partition Error: 0x8004242d
Formatting your hard disk drive is essential for many reasons. Many use this to rid their drive of all the data, for a clean install of a new OS like Windows 10 and many other reasons. However, sometimes you might encounter errors regarding the formatting process. In this article, we will show you how you can solve partition formatting problems with the use of DiskPart. We’ll also recommend some third-party software you can use to make the process easier and faster.
Overview of the Error: 0x8004242d
As previously mentioned, you may encounter errors while trying to format a drive or partition. This may be in the error code 0x8004242d. This usually indicates a corrupted setup disk, outdated mass storage driver, improperly plugged in data cables, issues with hardware, etc. Generally, this is a formatting failure.
When dealing with this problem, the primary concern is not to find out where the problem is coming from but to allow us to proceed with the format. Here’s how you can fix ‘Failed to Format the Selected Partition’.
Causes of failed to format the selected partition Error: 0x8004242d
Let’s see some of the reasons for the occurrence of error 0x8004242d:
- The data cable of your computer is loose.
- The setup disk has a corrupted file system error.
- The mass storage controller or a mass storage driver of your computer is outdated.
- Your system’s Windows is incompatible with a mass storage controller or a mass storage driver.
- The hard disk to install Windows OS on is a dynamic disk.
Solution 1: Deleting all partitions
The most common reason for this issue is the Master Boot Record of the drive encountered corruption. When installing Windows, the installer can't locate the needed partition correctly. However, quite a few users have solved this issue by deleting all partitions.
Thus, you can also try to fix this issue by deleting each partition one by one when booting from the installation media rather than formatting it. Note that before doing this, back up all of the important data. If you happened to delete all partition and lost some important data, don't worry, you can still resort to the professional data recovery software to get deleted data back.
Wondershare Recoverit is capable of recovering lost data from deleted or damaged partitions with ease. With 3 simple steps, you can get all data back.
First, download and install the software. Launch it and select any partition for scanning. With the scanning done, check the data you want to keep and click the Recover button to save them. Note that save the recovered data on an external drive in case of overwriting the old data.

Solution 2: Use DiskPart utility to clean disk
- Open Command Prompt by typing it in the Search bar or typing cmd in the Run tool.
- In the command line, type in diskpart and hit Enter.
- Type in list disk and hit Enter.
- The window will show you a list of active disks. Determine the disk number of the disk you want to fix.
- Type in select disk # (# stands for the disk number, replace it with whatever disk you’re going to work with)
- Type in clean and hit Enter to delete the data in your chosen disk.
- Once the process is finished, you’ve already deleted all the data within the partition.
- Exit Command Prompt and proceed with the installation of your Windows.
Solution 3: Use a third-party partition software
Here is ten of the best third-party partition management software you can download for free on your computer.
-
AOMEI Partition Assistant
AOMEI Partition Assistant is an all-in-one tool that makes use of a step-by-step wizard to help users operate it more easily. It also has the feature of running without an operating system. It’s packed with many features you might need to fix partition issues.
-
Active Partition Manager
Active Partition Manager is simple yet powerful software. The interface is very clean, thus making it highly user-friendly. It supports many file types like FAT, NTFS, exFAT, HFS, etc. If you’re looking for all-around software, this might be a good choice.
-
GParted
GParted is very popular among tech websites for its many advanced features. It allows you to create, delete, merge, and resize partitions with just a few clicks. Tasks are performed much faster because the program allows you to queue up tasks without requiring a PC restart.
-
Cute Partition Manage
Cute Partition Manager is unique in that it doesn’t require an operating system to run. This program is suitable for those who want to work with only their keyboard as this is 100% text-based. It might be intimidating but because this only requires typing in commands, it’s easy.
-
Macrorit Partition Expert
The defining feature of the Macrorit Partition Expert is its organized and clean interface. All of the features are showcased on the dashboard so you won’t have to find them anymore. You can also queue up as many tasks as you want and only make changes by clicking the Commit button.
-
Paragon Partition Manager
If you like thorough and complete instructions, Paragon Partition Manager may be your best choice. It also allows you to preview the changes before actually applying them to your computer, making it less prone to mistakes. It’s very versatile too; supporting many file types like NTFS and FAT32.
-
IM-Magic Partition Resizer
It might seem like magic when you’re working with IM-Magic Partition Resizer. It allows you to copy, merge, move, delete, and even resize active partitions. If you’re in a hurry, you might enjoy this program because it installs very quickly.
-
Tenorshare Partition Manager
Simplicity is what Tenorshare Partition Manager is going for. The interface is very clean. Every feature can be found at the top-most part of the program so that you won’t need to look around each time you’re going to make any changes. All of the features you need in partition software are also included in the free version.
For the average PC users, formatting a drive or partition is difficult enough to do. So if one suddenly comes across errors while performing this task, it might seem complicated already. By carefully following the steps above, you will solve error 0x8004242d in no time.
Read More:
What Is Magic Partition Recovery?
Solution 4: Format Partition during Window Installation Process
To fix the selected partition error 0x8004242d, you can choose to delete all the partitions first, create a new partition, and ultimately format the partition. To do so:
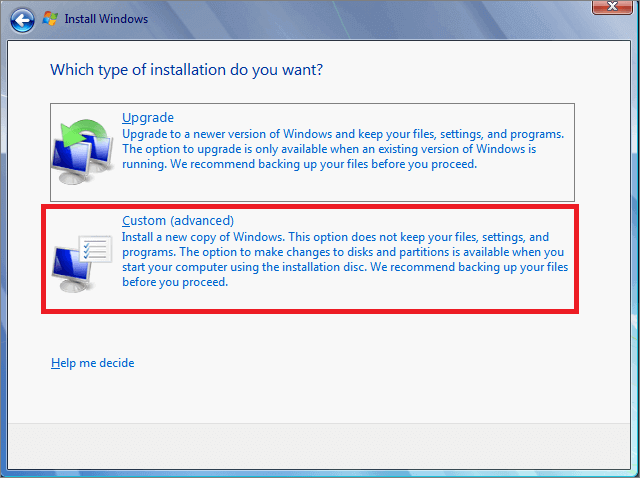
- Run the Windows installation setup program, click on "Install Now," tick the box of "I accept the terms of the license," and hit "Next."
- Click on "Custom (advanced)," choose the partition, and click on "Delete."
- Delete the present partition on the end disk.
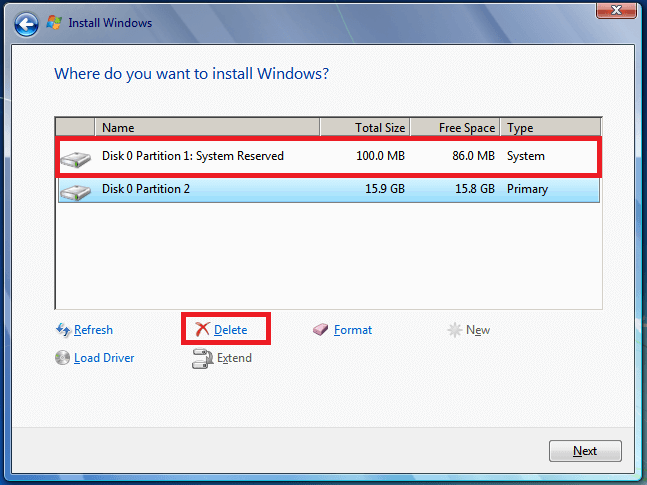
- Click on "Create new partition" to generate a new one, select the new partition, and click on "Format."
Solution 5: Disabling USB Boot Support
Another potential cause of failing to format the selected partition error may be some conflict between the legacy setup (BIOS) and the new counterpart (UEFI). The new computers, which might include both, might end up facilitating the apparition of the Failed to format the selected partition (Error 0x8004242d) error in case of UEFI Boot Support is enabled.
So, in this situation, to fix the error, you can try restarting your computer and disabling the UEFI Boot Support by entering the BIOS Configuration Settings menu. Most of the time, this method has been reported successful for such error. Now, after restarting your computer, power on your computer. Then as soon as the initial startup key comes up, start pressing the Setup key. It would be best if you kept pressing it repeatedly until you find yourself inside the BIOS menu. Generally, the Setup key is one of the F keys (F2, F4, F6, F8, and F10) or the Del key. However, if it's not displayed on the screen, you can search online for specific steps on accessing your BIOS settings.
Now, once you're inside your BIOS settings menu, go to the BOOT tab and ensure that the UEFI Boot Support is Disabled. After you have modified it, save the modifications and check if the issue has been resolved by repeating the previously caused Failed to format the selected partition (Error 0x8004242d) issue.
If you manage to complete the Windows installation, you can also reverse engineer the process and re-enable UEFI Boot support.
Video Tutorial on How to Recover Lost/Deleted Partition Data?
Partition Recovery
- Partition Management
- Solve Partition Problems
- Partition Tips


Theo Lucia
chief Editor