[7 Solutions] How to Fix USB Transfer Speed Is Slow?
Why is my USB transfer speed so slow? How can I speed up my USB transfer speed? These problems may be bothering you in your work time.
If you find your USB transfer speed slow, there are several ways you can fix the issue. Most of the time the error can be rectified with the Windows' built-in tools itself. However, if the problem is severe, you need a third-party app that has been designed specifically for the purpose. That said, here you will learn about a couple of methods to improve the performance, typically the transfer speed, of your USB drive.
Part 1: Why Do USB Drives Transfer Data So Slowly?
To begin with, this is a relative question. If you bought a new piece and notice USB transfer speed very slow Windows 10 or Mac, the device itself might not be faulty. To confirm, you can check the version of the drive you received, i.e. if it is 2.0 or 3.0. The information can be found on the body of the drive or on the cover it was shipped in.
For reference, the transfer rate of USB 2.0 is 480Mbps (Megabits per second), whereas a USB 3.0 can send or receive data as fast as up to 5Gbps (Gigabits per second). There are many tools such as USB Flash Benchmark, SpeedOut, USBDeview, etc. that allow you to check the speed of your USB for free.
Therefore, before doubting the integrity of your flash drive, it is advisable to check if the speed you are getting is normal. In case you notice significant lethargy in the functioning of the device as compared to what you should get or were getting earlier, there could be a couple of reasons for that including:
The common reasons that cause usb drive slow:
1. Inappropriate USB Port
If you are plugging a USB 3.0 flash drive to a USB 2.0 port, the maximum speed you will get is only 480Mbps, which is more than 10 times slower than the speed you got on a USB 3.0 port.
2. Faulty USB Port
Not particularly hardware, but the USB port might have malfunctioned or may have an obsolete driver. Isolating the issue post proper diagnosis, and then addressing it should fix the problem.
3. The Source Device
Since the transfers may take place from USB to your PC or vice versa, any issue with the source device may hinder the performance. Such problems may include bad clusters, virus infections, bad sectors, improper or incorrectly managed file systems, fragmented files, etc.
4. The Target Device
As it is with the source device, the target device could be faulty as well. In case your USB is the target device and it shows poor performance, it may have an incompatible file system, faulty file allocation table (FAT), or bad sectors. Detecting the problem(s), and fixing it/them should bring the device back to normal.
Depending on the cause of the trouble your flash drive has, the solutions may vary. Some of the most effective methods to resolve the issue include:
Part 2: 7 Effective Methods to Improve USB Transfer Speed
Once you have noticed that the USB transfer speed slows on PC, it is now time to dive in and try all the possible solutions that could fix the problem. All those six troubleshooting methods are explained below in detail:
Method 1: Change the USB Port
If there was a malfunction on the port your USB is connected to, it is a good idea to disconnect the device from there, and plug it into a different port. In case you are using a desktop computer, it is advisable to connect the flash drive to any of the rear ports of the system case (usually referred to as the CPU).
If the computer is able to detect the USB, you can continue using it normally, and the issue with the culprit port is likely to be fixed automatically upon the next Windows restart.
Method 2: Recover Data and Format the Drive
The USB transfer speed slow issue may be caused by the bad sectors on the drive. The most effective way to solve this problem is completely formatting the drive to fix all the bad sectors, but it will erase all the data stored here. You can recover files from USB at first, then format the USB drive. To do so, follow this:
1. Recover files from USB
When talking about recovering the lost files, even though there are several data recovery tools available in the market today, the most trusted one that also simplifies the entire process is Wondershare Recoverit.
The software works in real-time where it automatically detects any new drive that is connected to the computer and then allows you to scan it for the deleted or lost files. In addition, the program has a special option specifically dedicated to the movie files that lets you repair corrupt videos to fix their damaged or missing audio.
Step 1: Select the USB Drive and Begin Scanning
Connect the faulty thumb drive to any of the USB ports on your computer running Windows 10, launch Wondershare Recoverit, select the radio button representing the USB drive from the External Devices section, and click Start from the bottom-right corner of the interface.

Step 2: Check the Preview and Recover Data
On the next window, wait while Wondershare Recoverit completes the scanning process, and click Got it on the confirmation box that appears. Next, go to the File Type tab from the top of the left pane, check all the boxes the pane has, and click Recover from the bottom-right corner of the window to recover all the lost and/or deleted files to another location.

2. Format the USB Drive
Note: Following the steps given below erases all the data from the USB forever and for good. Therefore, regardless of the transfer speed you get from your faulty drive, make sure to back up the important files, and then proceed further: If you accidentally formatted the drive before seeing this warning, stop using the flash drive and learn how to recover those deleted files.
Step 1: Get to the Drive Format Box
Connect the faulty USB drive to your PC (a Windows 10 computer is used here for illustration), click File Explorer from the taskbar, right-click the flash drive's icon from the navigation bar on the left and click Format.
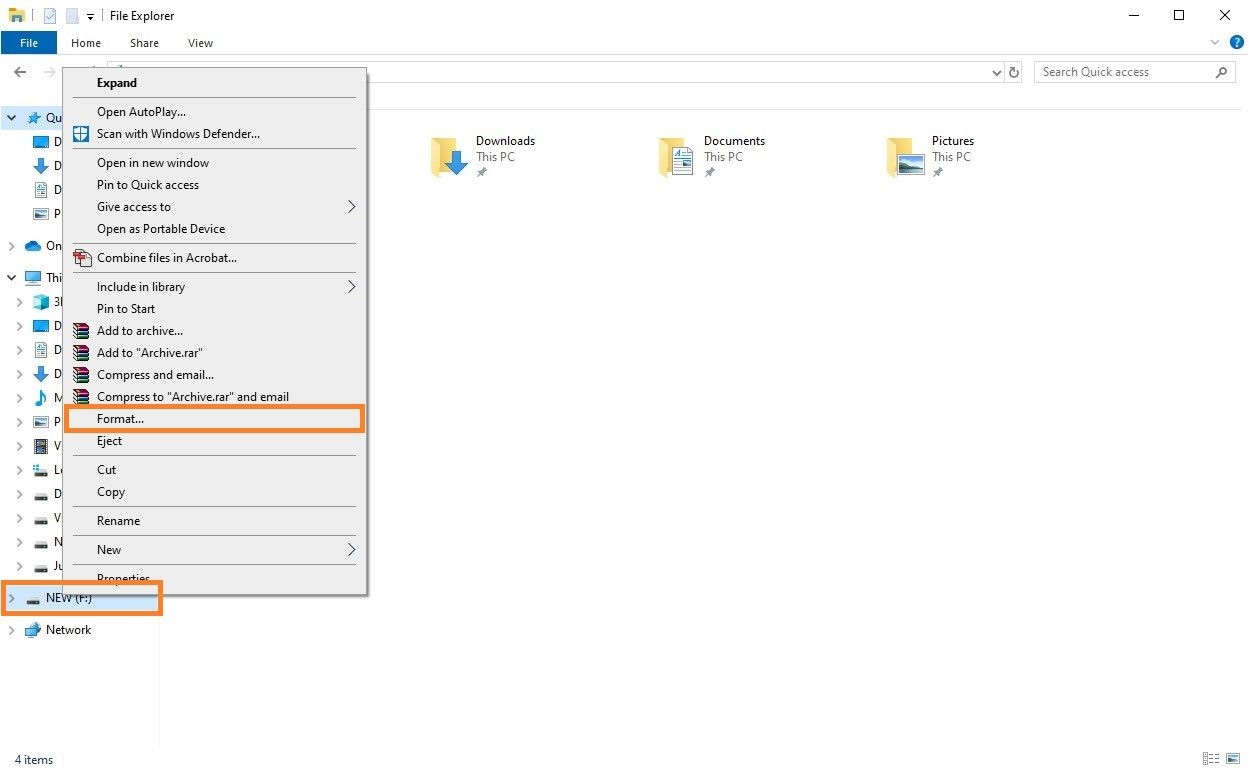
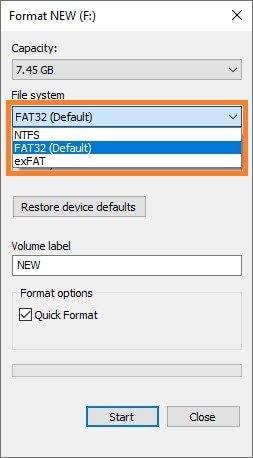
Step 2: Select File System
Choose your preferred file system from the File system drop-down list.
Note: Default is FAT32 but you can choose NTFS to enable file and folder level security on the drive.
Step 3: Format the Drive
Check the Quick Format box from the Format options section, click Start from the bottom, and on the system warning box, click OK to begin the formatting process.


Wait while Windows 10 successfully formats the drive, and click OK on the Format Complete information box that appears post completion. Back on the Format box, click Close and continue using the USB drive normally.


Method 3: Update Chipset Drivers
It is usually the chipset and disk drivers that are the main culprits for the degraded performance of your thumb drive, and updating them to the latest version resolves the issue most of the time. The step-by-step procedures for updating both the device drivers are given below:
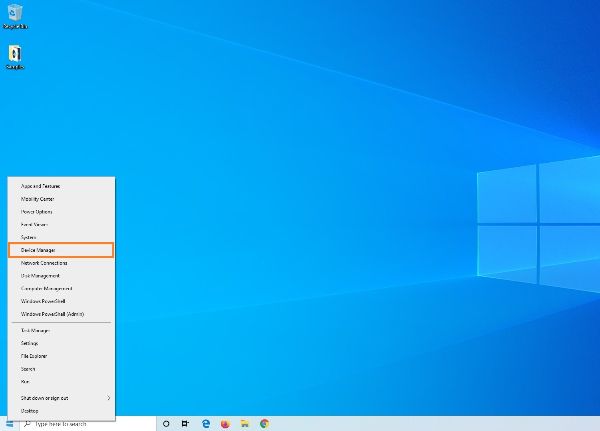
Step 1: Get to Device Manager
Assuming that you are using Windows 10 and that the USB drive in question is connected to the computer, right-click Start, and click Device Manager from the context menu.
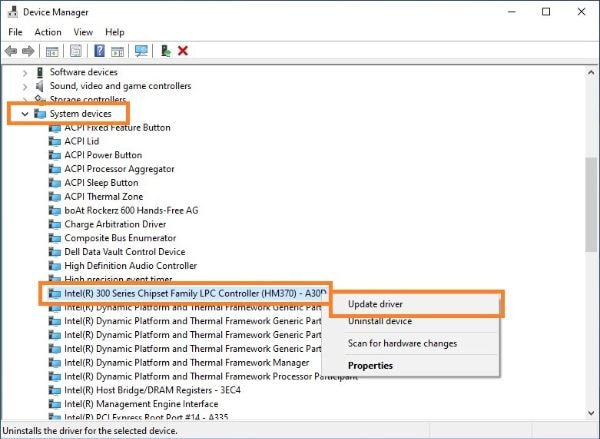
Step 2: Update Chipset Driver
Expand System devices, right-click Intel(R) 300 Series b Family LPC Controller (depending on the model of your PC and the motherboard it has, this name may vary), click Update driver from the context menu, click Search automatically for updated driver software on the next box that comes up, and let Windows search for the latest driver. Once found, you can follow the on-screen instructions to install the new chipset driver for your computer. Close all the boxes when done, and restart the PC to allow the modifications to take effect.
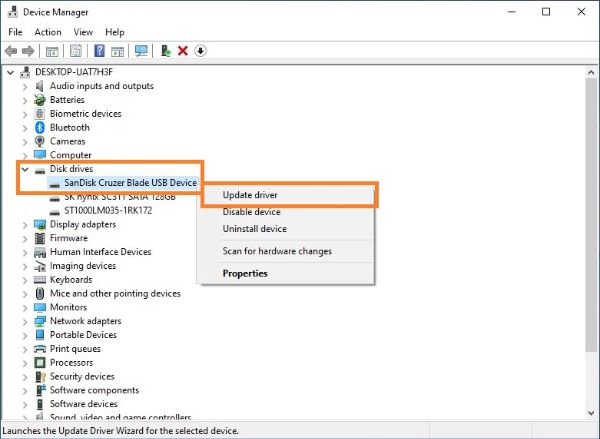
Method 4: Update Disk Driver
Step 1: Get to Device Manager
Connect your USB drive to the computer, and follow the process explained in Step 1 of the previous section to get to the Device Manager snap-in.
Step 2: Update Disk Driver
Expand Disk drives, right-click the USB drive from the available list, click Update driver, and on the next box, click Search automatically for updated driver software. Follow the on-screen instructions from there to update the disk driver.

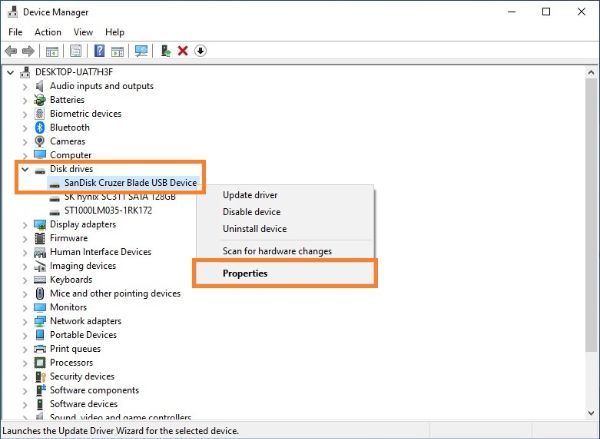
Method 5: Optimization
Another method you can try to improve your flash drive's speed is by configuring it to offer better performance rather than allowing you to disconnect it from the computer merely by plugging it out from the port. You can follow the steps given below fix if USB transfer speed slow:
WARNING: This process requires you to restart Windows. Therefore, to avoid losing any important data, make sure that you have saved all your work and have closed all the running applications before proceeding.
Step 1: Go to Device Manager
Confirm that the USB drive is connected to the computer, right-click the Start button, and click Device Manager.
Step 2: Get to the Drive's Properties Box
Expand the Disk drives tree, right-click your USB drive, and click Properties from the context menu.
Step 3: Optimize the Disk
Go to the Policies tab, select the Better performance radio button, click OK, and on the System Settings Change box, click Yes to restart your computer.
Method 6: Check BIOS/Firmware for USB 3.0
This method requires you to enter into your motherboard's BIOS or UEFI (Unified Extensible Firmware Interface). Depending on the manufacturer and the architecture of the board, the process of checking for and enabling USB 3.0 may vary. Nevertheless, regardless of the screens and the name of the options that your computer's BIOS/Firmware has, the basic principle remains the same. The following instructions explain how to enable USB 3.0 on your computer.
Step 1: Go to the Motherboard's BIOS/Firmware
Earlier you could enter the BIOS setup by pressing the Del key repeatedly right after powering on your computer. However, the new PCs have different keys to take you there. For some it is F12, for others it is F10, and for a few of them, it is even the Esc key. Therefore, you may need to check the manufacturer's website or your PC's Owner's Manual to find out the correct key or combination of keys to get to the Firmware or BIOS window of the motherboard.
Step 2: Enable USB 3.0
Use the left and right arrow keys on your keyboard to get to the Advanced tab, use the up and down keys to select USB Configuration (or something similar to this), and press Enter. On the next screen, use the arrow keys again to select USB 3.0 (or 2.0) Support, press Enter, select Enabled or USB 3.0 (whatever option is available to enable USB 3.0), and press Enter again.
Step 3: Save the Changes and Restart
Press F10 and then press Enter to save the settings and restart the PC. In some computers, you may need to go to the Exit tab and pick Save and Restart (or any other similar option) to exit the setup saving the changes.
This method works in correlation with the next one, Method 3, wherein you first follow the steps given here to recover your lost files from the USB, and then move on to the next procedure to convert the drive to NTFS in order to make it secure so it doesn't come up with any security issue again.
Method 7: Convert USB Files System to NTFS
For a better transfer speed of the files bigger than 4GB, it’s recommended to convert the USB file system to NTFS, which works better. So if your USB drive is FAT32 now, you can convert the file system to NTFS to increase the USB transfer speed.
Follow this way to convert the file system to NTFS:
- Press Win+S. Type in cmd and press Enter.
- Right-click Command Prompt and launch it as administrator.
- Type: convert E: /fs:ntfs(E refers to the drive letter of the USB drive), then press Enter to get the process started.
Conclusion
If you notice USB transfer speed slow, before starting with the troubleshooting, scan the drive with a strong antivirus program and see if the performance improves after that. If the issue persists, any of the solutions discussed above would help. However, if you are looking for an easy way to rectify the problem, you can jump right on to Method 2 to use an efficient tool, Wondershare Recoverit that is worth a try.
People Also Ask
-
How long does it take to scan a flash drive?
The time it takes to scan a USB drive depends on several factors such as the type of antivirus program or scanning tool you are using, the amount of RAM your PC has, the capacity of the drive you are performing the scan on, and the number of files there are to be scanned. Ideally, a 16GB USB drive with some errors and a couple of hundred files roughly takes around 20 minutes to 45 minutes to scan.
-
How can I check whether my data is recoverable or not before purchase?
While using a genuine and efficient tool like Wondershare Recoverit, you can notice that it has a Preview window in the right pane. After scanning, if the preview of the media content is available, it means that the app can access the file, and it's safe to purchase a licensed copy of the program for full data recovery.
-
Why is my USB transfer speed so slow?
There could be several reasons why your USB transfer speed is slow. Some common factors include outdated USB drivers, a faulty or incompatible USB port, using a USB 2.0 port instead of a USB 3.0 port, cable issues, or even fragmented files on the USB drive. Additionally, if you're transferring multiple small files, it can slow down the overall transfer speed.
-
Can a full USB drive affect transfer speed?
Yes, a full USB drive can potentially affect the transfer speed. When a USB drive is nearly full, there may not be sufficient contiguous free space to store the transferred files. This can lead to fragmented storage, where the files are stored across different physical locations on the drive, causing slower read and write speeds. It's recommended to keep at least 10-20% of the USB drive's storage capacity free to ensure optimal performance.
USB Solution
- Recover USB Drive
- Format USB Drive
- Fix/Repair USB Drive
- Know USB Drive


Theo Lucia
chief Editor