How to Fix Windows 10 Stuck on Repairing Disk Errors
Q: How to fix Windows 10 stuck on repairing disk errors?
"Hey, friends. I am facing an issue right during the Windows startup. When I start my PC, the logo of Windows 10 shows up and disappears. After some time, it pops up again with an error that says, 'preparing automatic repair.' After that, a new message 'Repairing disk errors. This may take over an hour to complete' keeps showing on my screen. How can I resolve this disk error?"
If you don't fix the disk errors in time, then they can become catastrophic and even disturbing. Remember, Windows 10 consists of a lot of disk errors. We should never overlook such errors as they can corrupt the hard drive files and also make the hard drive (both internal and external) inaccessible.
As we know, Windows 10 OS often tries to resolve these disk errors upon booting; however, if the disk error is severe, then the computer might get stuck during the repairing of the hard drive.
Nowadays, a lot of Windows 10 users are reporting a common error that shows a message "Repairing disk errors" repeatedly appearing on their screen. It seems like an irritating error as it appears on the boot screen and doesn't allow you to proceed. Many times, this error goes after an hour and lets your computer to work normally. However, it shows up again the next time when you try to sign in into Windows. In this way, you may be stuck into the repairing disk errors loop. Besides, in many cases, nothing happens even after waiting for several hours. So, if you are also annoyed by seeing this particular error appearing on your screen, then it's time to act and fix it immediately.
Part 1: The Problem Overview: "Repairing Disk Errors" Windows 10 Loop
Regardless of the computer brand, disk error can occur suddenly. However, the "Repairing disk errors" are quite common in Windows 10 HP computers. Several factors can cause the "Repairing disk errors" loop, such as a game crash or upgrading your old version to Windows 10, etc.

So, when your laptop keeps saying repairing disk errors, then it means that there is something wrong with the boot disk. Thus, your system is unable to boot from that particular disk. These errors are mostly the case of a virus or malware attack, inappropriate shutdown, immediate power breakdown, bad sectors, etc.
Now, you might be wondering - how long does repairing disk errors take? Also, how to resolve this error and gain access to your computer? In most cases, the repairing disk error disappears just after an hour you see it. This error occurs during the Windows startup; and sometimes, you can wait for a couple of hours to see if the issue gets fixed automatically. You can also try to solve it by restarting your computer. However, if both these quick fixes don't work out for you, then you can try the solutions given below.
Part 2: How to Quickly Fix Windows 10 Stuck on Repairing Disk Errors?
Before we move ahead and explore different ways to get rid of "Repairing disk errors," you should first try the CHKDSK method. Many computer geeks prefer this method as it plays an important role in effectively scanning and repairing different disk issues. However, it mostly takes several hours to complete. Therefore, you should let your computer run overnight and complete the process. If you continue to receive the "Repairing disk errors" problem even on the next day, then it is advisable to try the below methods. Below we will discuss three quick fixes for repairing the disk errors loop.
Method 1. Restart From Safe Mode With Networking
If the repairing disk errors issue continues to appear on your laptop screen, then you can restart your device differently. Try Safe Mode with a networking option. The below steps will assist you in getting the "safe mode with networking" option.
Step 1: To get the sign-in screen, you should hold the shift key on your keyboard and press the power button. After that, click on the "Restart" option.
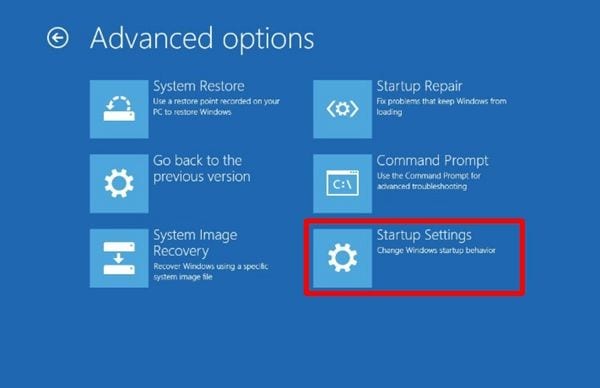
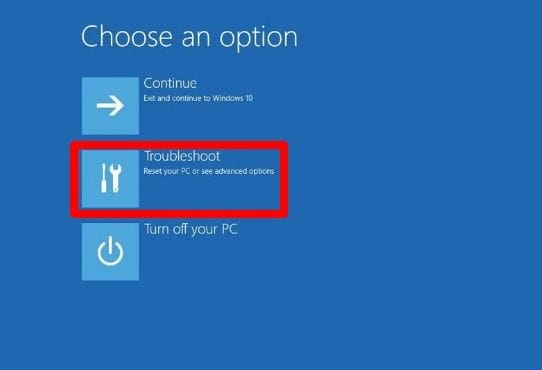
Step 2: After restarting your computer, you will see "Choose an option" on your screen. At this point, choose "Troubleshoot." Then, go to the "Advanced options" and select "Startup Settings." Lastly, choose "Restart."
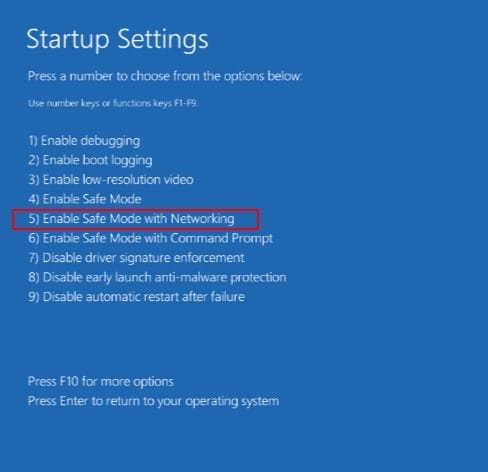
Step 3: After restarting your computer, your screen will show a list containing around nine different options. You can find the "Enable Safe Mode with Networking" option on the fifth number. To choose it, you can press either a function key "F5" or number key "5."
Well, safe mode is a great option to solve numerous computer issues. So, it will most probably solve stuck "Repairing disk errors."
Method 2. Run Automatic Repair/Start-up Repair
In the second method, we will discuss how to get rid of the stuck Repairing Disk issue with the help of an automatic repair. For that, you will require an installation disk or USB.
Assuming that your computer fails to start normally even in the safe mode, you can perform an automatic repair or startup repair by following the below instructions.
Step 1: First of all, insert the Windows installation media on the computer. After that, restart the computer.
Step 2: Now, the logo of the manufacturer will pop up on the computer screen. Here, you should enter the boot menu by pressing the boot menu option key continually. It is usually the function key "F12." You can use an up arrow or down arrow to select the boot option from the installation media.
Step 3: Now, a new prompt message that reads "Press any key to boot from CD or DVD" will appear. So, you can press any key.
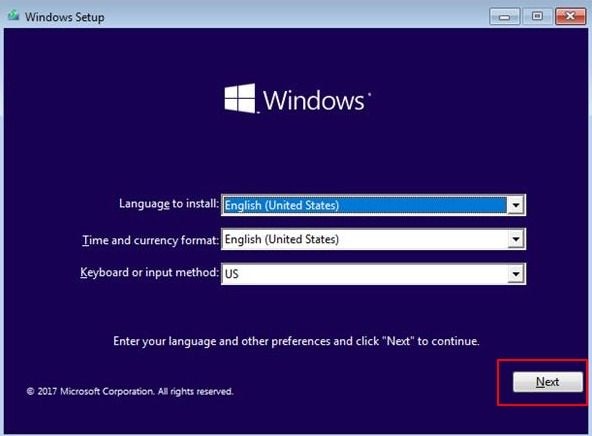
Step 4: In the next window, make sure you choose the right keyboard type, language, and time. Once you fill all the preferences, click "Next."
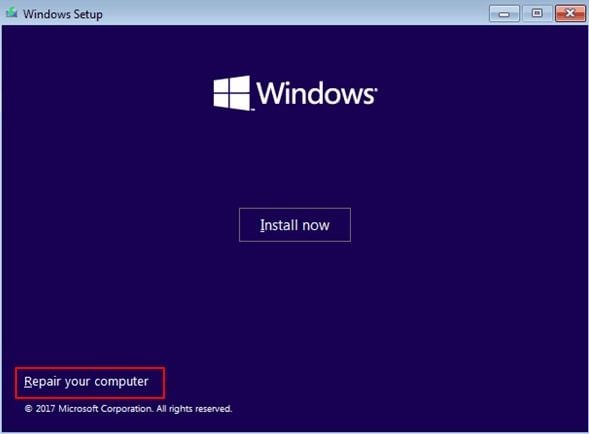
Step 5: The next screen will present an option "Repair your computer" on your screen; click it.
Step 6: Here, you get to see the "Choose an option" screen; select "Troubleshoot."
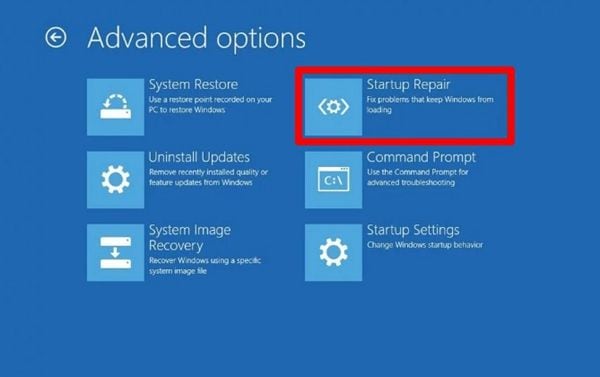
Step 7: Once you get into the "Advanced options" screen, you should pick the "Startup Repair" option. After that, wait for some time and let the Startup repair process finish.
After the completion of the Startup repair process, you should restart the computer and check if the issue has gone. Nevertheless, if the Startup repair method also fails to resolve the issue, then you should try the next method.
Method 3. Perform System Restore from Boot
The last solution that we are going to discuss here is to perform the system restore. This method will take your system settings and files back to the old point. Moreover, it won't affect your important files and personal data in any way. Assuming that your computer fails to start, you can perform a system restore as shown below. Note that the starting operation of this method is the same as method 1 that we have discussed earlier.
Step 1: First of all, boot your device with the help of Windows installation media. We have already shown it in method 1.
Step 2: Now, select the "Repair your computer" option when you see the Install Windows screen.
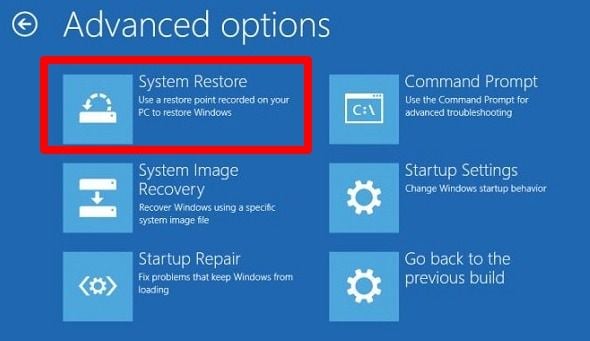
Step 3: On the next screen, choose "Troubleshoot." After that, select the "System Restore" option on the "Advanced Options" screen. A system restore wizard will guide you; so, follow it to complete the recovery process.
In this way, you can perform a system restore from the boot and solve the "Repairing disk errors" issue. All these three methods are helpful. You can select any method depending on the situation. However, you may also need to replace your hard drive because a faulty hard drive also leads to this error.
Method 4. Let It Finish Overnight
The first thing you should do is keep calm and wait for the process to finish automatically. As I mentioned before, this process usually takes around 40 to 80 minutes, but sometimes when a storage device suffers from physical wear and tear on its components, the repair time may be extended to a few hours. Letting the process run uninterrupted overnight might be the best option.
Method 5. Replace Drive
If the repair process never ends, it is most likely because the integrity of the files has been damaged to an irreparable degree or it may even mean that the SATA cable or even the storage device is in very bad shape.
To correct the problem of critical data corruption, you can connect the device to another computer. In this way you will avoid booting Windows from the damaged device and you will be able to access the files that you need to back up safely. Once you're done, you can perform a clean installation of Windows from scratch, which will rebuild the partition tables and file system on the device.
Besides, if you consider it necessary to replace the device with a new one, there is information that may be extremely useful.
There are two main storage devices on the market. These are the HDDs and SSDs. You must bear in mind that the price difference is mainly related to the fact that they work differently. An HDD has moving components inside and this makes it a "fragile" device. However, these devices usually offer a large storage capacity at a low cost, with the main disadvantage of having slower read times than those of an SSD. On the other hand, SSDs can be considered very safe devices since they do not have any moving parts inside, but their main disadvantage is the life time. The lifetime of an SSD is determined by the amount of TB written since, in these devices, the information is stored in cells that with each writing process gradually lose the ability to retain the information.
Remember that storage devices are not only differentiated by cost, therefore, you must take into account all the characteristics they have before selecting the device, because the ideal is that you select one according to your needs. Also, remember that no device is foolproof. Constantly backing up your information can save you a lot of problems, and backing up information is usually a fairly straightforward procedure.
Conclusion
Well, resolving the "Repairing disk errors" issue is not a hard task. You can execute some of these methods without even signing in whereas some methods will need a logged-in user. However, you should first try a simple scanning and repairing process by using the chkdsk command. In most cases, this command will solve the disk error. But if this command doesn't work out, then you already know three different methods to fix it.
Many Windows 10 users often come across this error. After getting this error, a lot of users prefer to wait. But sometimes the error persists and gets stuck at the main booting screen. So, if this error doesn't disappear even after trying all three methods mentioned above, then chances are something is wrong with the hard drive. You can try replacing the hard drive and see if it resolves the issue.
FAQs
How long does it take to repair disk errors?
If you are repairing the disk errors with chkdsk, it will take a minimum of four hours to fix the disk errors. However, it can take a longer time as well.
Does repairing disk errors ever work?
Yes, repairing the disk errors works because it helps store the data properly and the drive will work normally after repair.
What is the cause of repairing disk errors?
These errors generally occur when the boot disk is not capacitated to boot the computer. It can be caused by bad sectors as well.
How do I fix Windows 10 that failed to boot without a disk?
You just need to launch the advanced startup options menu (press F11 for it). Then, open the advanced options from troubleshoot option and click on the startup repair option. Now, you just need to wait for a few minutes for fixing the bootup issue.
How do I restore my computer if it won’t boot?
Switch on your computer and keep pressing the F8 key until the advanced boot option appears. Then, choose with safe mode from command promote and hit the enter button. Now, type in rstrui.exe and press the enter button. It will result in the wizard instructions, so just follow them and the computer will be restored.
What's Wrong with Drive
- Recover Your Drive
- Fix Your Drive
- Format/Wipe Drive
- Know Your Drive


Theo Lucia
chief Editor