Aug 23, 2023 • Filed to: Take Data Backup • Proven solutions
It is said that Windows users should always be prepared to face the worst-case scenario. There are times when a Windows system can stop functioning out of the blue or get corrupted. To cope up with situations like these, it is important to have a system repair disc ready. Since it gives access to Window's System Recovery option, users should know how to create a system repair disc. To help you, we have come up with an in-depth post on the creation of a system repair disc in Windows. Let's get it started with and learn how to create a system repair disc right away!
What is a System Repair Disc?
Before we teach you how to create a system repair disc in Windows, it is important to cover the basics. In a nutshell, a system repair disc is a bootable disc that provides recovery options for Windows. Ideally, one can create a system disc from any functioning Windows system and later use it to fix a problem.
The size needed for it varies from one kind of operating system to another. For instance, it is around 170 MB for Windows 7. For other Windows versions, it could be more or less. Since the size is not much, ideally a CD or DVD is used as a medium for a bootable disc.
Even though you can use a flash drive to create a system recovery disc, it is not supported in Windows 7. It might work in Windows 10, but you would need an optical drive to make a bootable disc in Windows 7.
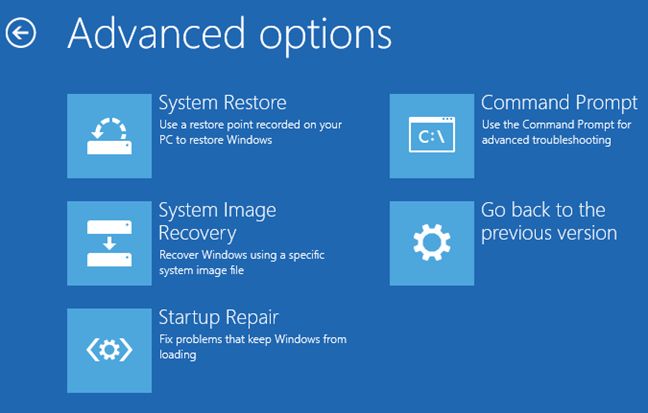
Since a system repair disc contains all the major recovery options, it can be used to perform a system diagnostic and repairing. After creating a system repair disc, you can have access to various tools like system restore, system repair, system image recovery, memory diagnostic, and more. Needless to say, all of this can help you save the day during an unwanted situation (like a system crash).
How to Create a System Repair Disc in Windows 7?
Now when you know how important it is to have a system repair disc, you should create one right away. Ideally, the process of creating a system repair disc is the same for most of operating systems. We have taken the baseline of Windows 7 in this post. Though, you can follow the same process for Windows 10 or 8 as well and create a system repair disc without facing any complication. All you need to do is follow these simple steps:
Step 1 Windows 7 provides an easy-to-use wizard to create a system repair disc. Firstly, you need to launch the Start menu to access it.
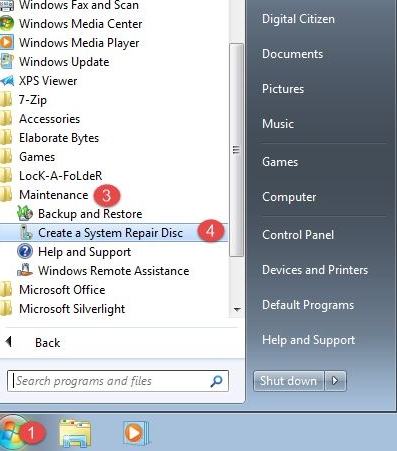
Step 2 Look for the "Create a System Repair Disc" option under the "Maintenance" section and click on it. It will be listed under All Programs > Maintenance > Create a System Repair Disc.
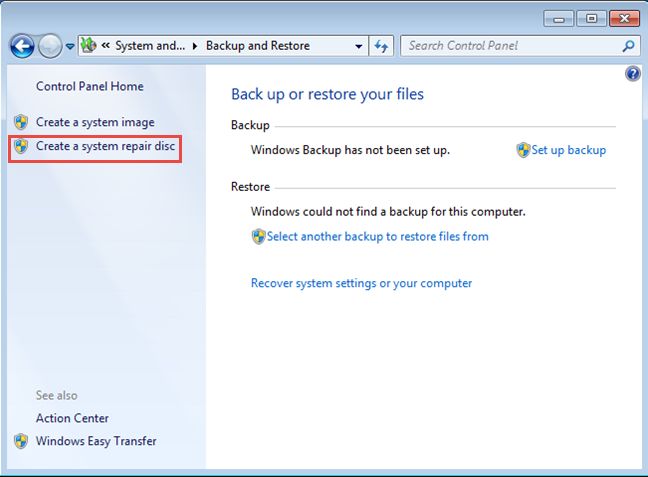
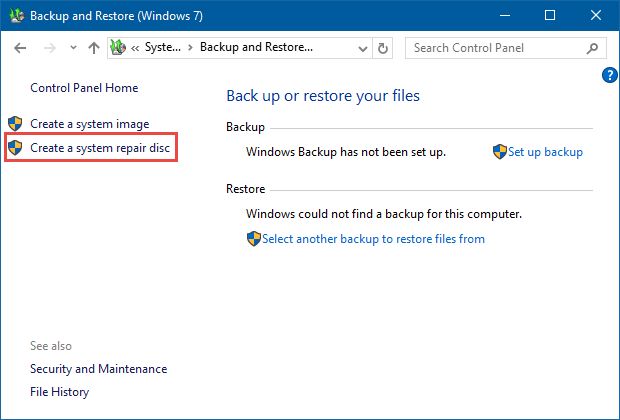
Step 3 Alternatively, you can also open it from the Control Panel. Go to System and Security > Backup and Restore and click on the "Create a System Repair Disc" from the list of options provided on the left panel.
Step 4 Lastly, you can also run the "recdisc.exe" command on the Run prompt to directly launch the wizard.
Step 5 Simply choose your preferred way and launch the wizard to create a new system repair disc on your system. Additionally, insert a blank CD or DVD in the optical drive of your system. It is recommended to work on a blank CD or DVD to create a new system repair disc. Needless to say, there should be enough space on the disc.
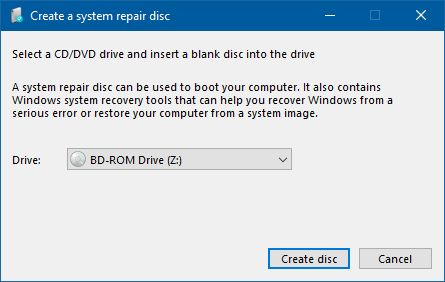
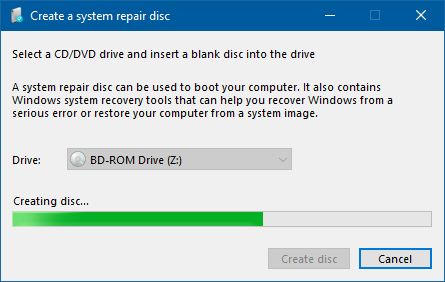
Step 6 After launching the system repair disc wizard, you will get a screen similar to this. From the drop-down menu, you can select the optical disc you have recently inserted. Once you have made your selection, click on the "Create Disc" button to initiate the process.
Step 7 The wizard will start preparing your disc for the process. Simply wait for a while and let it take all the needed steps.
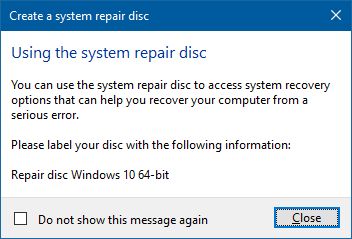
Step 8 Just before completing the process, you will get the following pop-up message. From here, you can give the necessary label to your disc. Close it once you are done.
Step 9 In the end, you will get the following message, depicting that the process has been completed successfully.
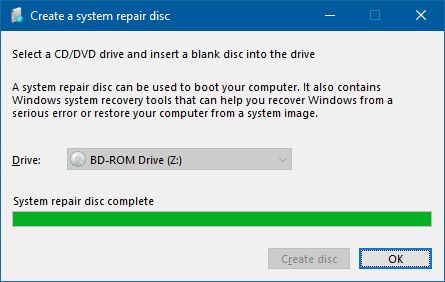
Simply click on the "Ok" button and eject the disc. Make sure that you don't eject it while the burning process is going on, else it will halt the operation in the middle. The entire process won't take more than 5 minutes and will provide constructive results in the end.
Furthermore, if you are using Windows 10, then you need to go to Control Panel > System and Security > Backup and Restore to find the "Create a system repair disc" option. After selecting the option, you would have to follow the same process to meet your requirements.
How to use the System Repair Disc?
Using the system repair disc is pretty easy. Since it can be used to repair your operating system or perform a recovery process, it would come in handy to you time and time again. After burning your system repair disc, you should keep it protected from any damage. At the time of need, you can follow these steps to use it.
Step 1 Insert the system repair disc in your computer's optical drive and let it recognize it.
Step 2 Now, restart your computer and press the power button.
Step 3 Go to the recovery option and choose to start your computer from the disc. You would need to make the changes in the BIOS settings for this.
Step 4 Select your language and start the recovery operation from the disc.
As you can see, using a system repair disc is pretty simple. It is a must-have tool for every Windows user and you should certainly create a system repair disc right away. It will help you repair your system or perform a recovery operation at the time of need. Go ahead and follow this stepwise tutorial and feel free to share it with your friends as well to help them.
Create a System Image Backup in Windows
Suggestions are provided for Windows computer users that creating a full system image backup is conducive to keeping system data secure. If your system unluckily gets corrupted and you have backups of the whole Windows system, then you can get back all the system contents including applications and configurations from the backup within minutes. To know about how to create an image backup for a Windows system, refer to the guide: How to Do Windows 10/7 Image Backup.
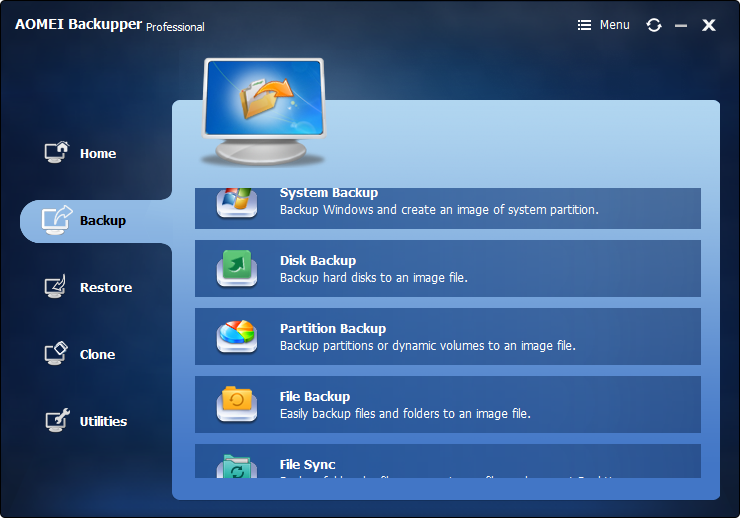
- Allows you to take automatic, full, incremental, and differential backups of system, disk, partition, and files.
- Supports system restore, disk restore, dissimilar hardware restore, partition restore, and selective file restore.
- Supports disk clone, partition/volume clone, flexible clone, system clone, and command line clone.
- Can schedule file sync for real-time data backup to internal hard disks and external hard drives.
- Offers additional essential utilities - PXE boot tool, merge backup images, encrypt image, etc.
- Supports Windows 10, Windows 8.1/8, Windows 7, Vista, and XP (all editions, 32/64-bit)
Data Backup Services
- Computer Backup
- Windows 10 Backup
- Windows 8 Backup
- Best File Sync Software
- Driver Backup
- SD Card Backup
- Best Incremental Backup
- Onedrive Automatic Backup
- Hard Drive Backup
- CMD Backup
- External Hard Drive Backup
- Hard Drive Backup Software
- Move Files from C Drive to D Drive
- Best Backup Hard Drive
- Mac Backup
- Cloud Backup


Amy Dennis
staff Editor