
QNAP and Roon have been in the market, the latter being one of the top software for music listening, with high-grade audio quality support. However, with the integration support for this software into QNAP, multimedia services need to improve heavily. In addition, there are specific details you must know and follow this upgraded audio system setup, all under discussion here.
Part 1. What Is Roon Server For QNAP?
To understand how to work with QNAP Roon, you must figure out their meaning, uses, and more.
Roon Server For QNAP Overview
Roon is known as one of the leading new audio systems, but with the QNAP combination, users can expect a more streamlined user experience. QNAP protects the available connections and data for streamlined music library management.
Integrating both types of software allows for RAID redundancy to carefully safeguard the music library. That is in cases of sudden data loss due to hard drive crashes. Besides that, it protects the system from offsite backups that can compromise security with thefts and ransomware attacks.
For example, with QNAP, you can keep snapshots of your data, so you have a recorded file to roll back your system in case of sudden data loss.
Key Features of Roon Server For QNAP
Multiple valuable features are available with QNAP Roon, some of which are:
- Portable software with premium AI support- With the Room app, it is much simpler to handle the UI and controls on iOS or Android smartphones better.
- Customize your channel- Users can customize what they are searching for and listening to through Roon, like browsing via genres, albums, artists, etc.
- Tidal support for quality improvement- You can expect high-grade audio quality here with the connected Tidal integration.
- Better external connections- You can stream songs in high-fidelity to the Room Ready speakers, connected to one network.
- Remote volume management- It is possible to access through a controller and adjust the volume levels on the synced Roon Ready speakers.
Performance of Roon Server For QNAP
QNAP Roon Server has a strong performance guarantee. It is compatible with multiple multimedia supporting platforms and devices, like Sonos, AirPlay, Chromecast, Roku, DLNA, and Fire TV, among others. The solution of QNAP is efficient for users to manage their diverse home multimedia, videos, and photos.
Another notable point to focus on for understanding the performance level of Roon service is the accessibility to multiple media applications, like Video Station, Photo Station, and Plex. In addition, it connects to other devices like tablets, smartphones, and operating systems.
Here, users will get access to various NAS models with powerful CPUs that contribute to high-performance power. Additionally, one can prepare many RAID groups and apply tiering and caching technology for HDD/SSD hybrid storage preparation. All of this assures high-quality performance at affordable pricing.
User Reviews Roon Server For QNAP
The feedback from users regarding this solution has been positive. The combined system assures a high-grade music system environment for users, and many have commented on the improved music library management:
Users |
Reviews |
| Verified User (Consultant) | This user mentioned the usage of QNAP NAS in their company for technical functions. Overall, it has made it easy to extract data faster at a high-quality guarantee without excess costs. |
| Tiago Mokwa | There are multiple benefits to using QNAP systems, like: Safe RAID setups for hard drive failure protection. Possible to increase storage and scale. Various apps are available for different business aspects. |
| The Computer Audiophile | The combined Roon QNAP solution is highly advantageous to this user for better storage capacity and usability with the music system. |
Pros and Cons of Roon Server For QNAP
The following are notable advantages and disadvantages of Roon QNAP.
Let’s see the benefits and cons:
Pros
High maximum capacity is available on different QNAP Roon systems; the smallest extends to 64 TB.
It supports easy connection with various devices, platforms, and systems for streamlined music management support.
There is convenient on-demand access for Roon Core hosting.
Cons
Users do not get M2 support as a default.
Anything lower than Core i3 multiprocessor does not have Roon support.
Part 2. How To Set Up Your QNAP NAS as a Roon Server?
Setting up the Roon server using QNAP NAS is straightforward and assures high-grade home audio system creation. Three factors are crucial here- the core (Roon app working with SSD storage), the controller (mobile device), and the output (Roon-ready device).
Step 1. Running the Roon Core on the NAS
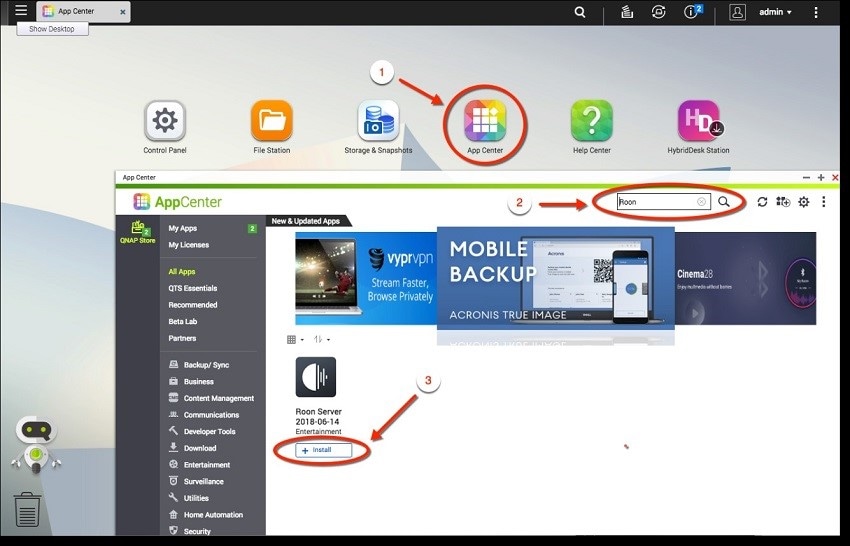
- On the QTS, access the App Center.
- Next, look for the Roon option.
- Tap on the Install button to start the Roon server installation process.
Step 2. Activate the Roon Core
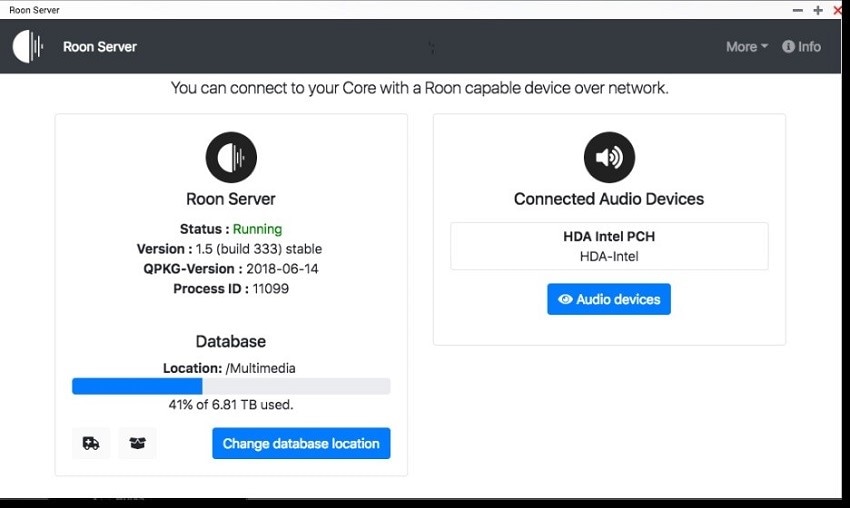
- After the installation is successful, tap on the Open icon.
- In the next window, tap on the Configure button.
- Next, choose the location where you will store the installed Roon Core and tap on the Save button.
- The Roon Overview page window will appear. Choose the new location for the database on your device. Or, you can restart the Roon server.
Step 3. Activate the Controller
- Your smartphone can work well as your Roon controller, so you should download and install the app first.
- Then, access the app on the smartphone after ensuring it works on the same network as the NAS.
- You can view all available Roon Cores in the network through the app.
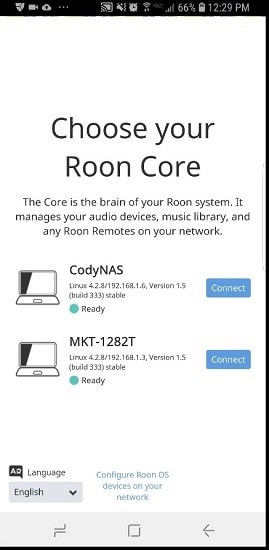
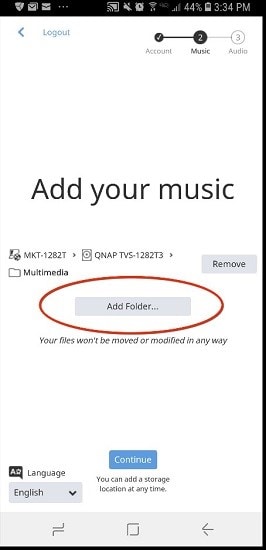
Step 4. Connect to Core
- Tap on the Connect icon to link to the suitable core.
- A prompt for signing into the Roon account will come up. So, you should log in first or opt for a free trial.
- Tap on the Add Folder option and choose the source folder for adding the music sources.
- Then, add other sources to the connected network.
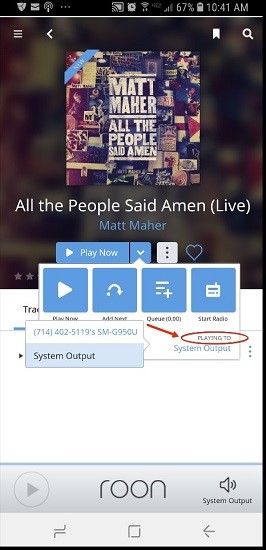
Step 5. Sync with the Output Device
- Check the network and the external media player device you are using to see if they are in sync with the network the controllers and Roon Core are connected with.
- Then, visit the album page and choose the output.
- Tap on the down arrow beside Play Now.
- Under the “Playing To” section, choose the preferred output.
For a better understanding, you can watch this video:
Part 3. Is It Possible To Recover Your Music Data on Roon Server For QNAP?
Indeed, it is helpful to operate with this system, especially since the QNAP helps protect against data loss in case of hard drive failure. However, the process of enabling it is complex for many.
In real life, different types of issues can cause the removal of data. These scenarios include damage to the hard drive, accidental deletion, unknown code, device corruption, formatting error, etc. Wondershare Recoverit is a better solution in these cases, especially with its new and improved NAS Data Recovery feature.

Wondershare Recoverit: Next-Level Support for Data Recovery from NAS Devices with Zero Data Loss
5,481,435 people have downloaded it.
It works on different storage devices and chipsets for SSDs, including the newer M2 options.
Useful for NAS data recovery in diverse situations like formatting, hard drive failure, device corruption, etc.
Recovers lost and deleted data from logically corrupted or failed NAS storage device types, like Thecus or QNAP.
Easy to use without unplugging the device.
Available for both a free version and paid version users.
How to Use Recoverit for NAS Data Recovery?
You must follow the following steps when recovering lost NAS device data using Recoverit.
Step 1. Install the software
- First, you must download the Wondershare Recoverit software from the official website of the solution.
- Follow the on-screen instructions to finish the installation process.
- Launch the app on your computer.
For Windows Vista/7/8/10/11
For macOS X 10.10 - macOS 13
Step 2. Choose NAS Recovery Mode
- After accessing the system, click on the NAS and Linux tab from the left pane.
- Tap on the NAS Recovery option in the left panel. This will start the scanning process in Recoverit for available NAS storage devices.

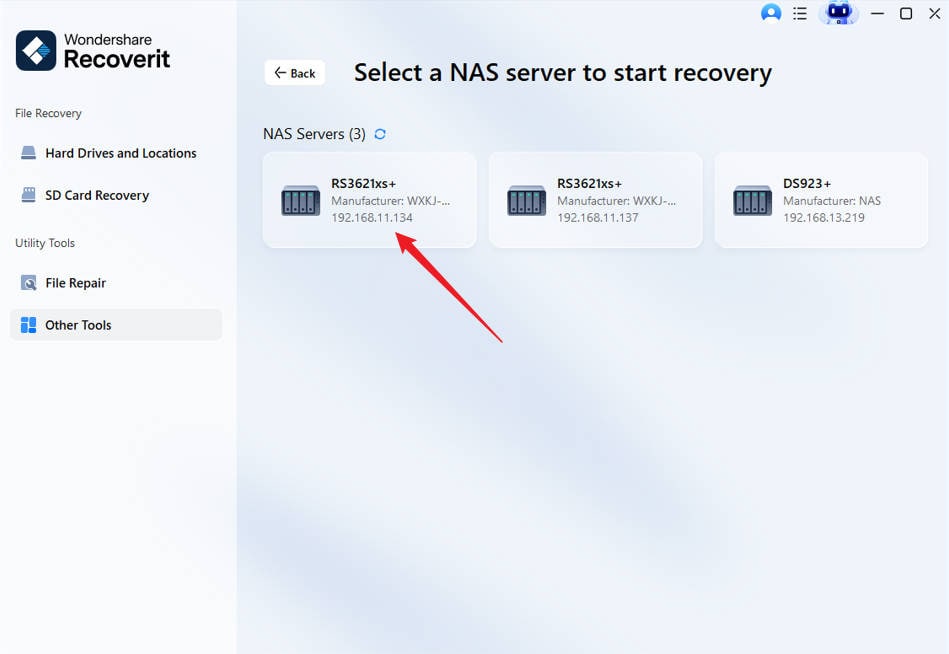
Step 3. Choose the NAS Device
- After scanning, the NAS-detectable devices will appear under the NAS Servers category.
- Find the device from which you lose your data. Then, click on it to start scanning.
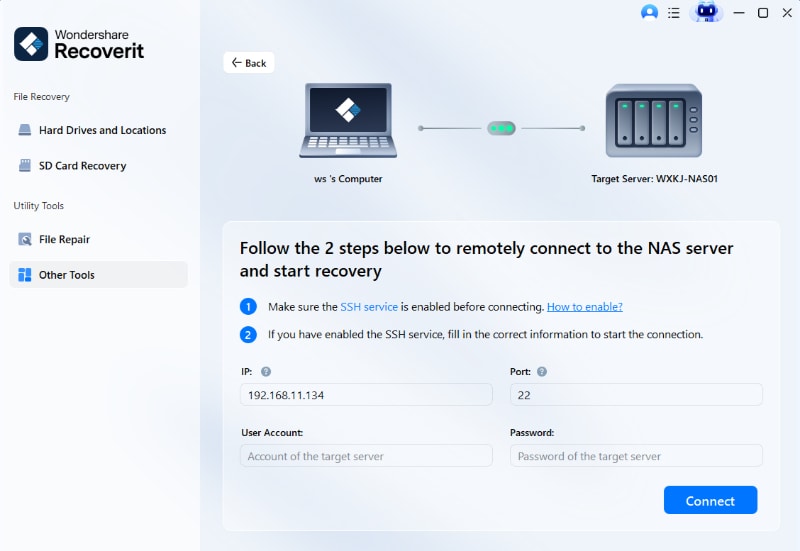
Step 4. Connect the NAS Device
- On the next screen, you will see different sections to input information into for making the connection.
- Add the relevant data, and press Connect. Recoverit will start developing the remote connection automatically.
- Then, the scanning process will start for all deleted or lost data in the NAS device choice.
Step 5. Recover The Files and Save
- It is possible to pause the scanning progress midway and recover files from those scanned so far.
- After the scanning process, you can preview the processed files.
- Tap the Recover button in the Preview window, choose multiple files in the batch selection, and then press Recover. Choose where you want to files to save beforehand.

Video Tutorial on How to Recover Files from NAS Server?
For Windows Vista/7/8/10/11
For macOS X 10.10 - macOS 13
Conclusion
Overall, it is possible to use QNAP Roon's combined solution to manage the multimedia library well while ensuring no data loss is possible. However, if you want more intensive data recovery support for the NAS device data, you should operate Recoverit for more focused recovery work. Both are beneficial, so learning each version is helpful for you.
For Windows Vista/7/8/10/11
For macOS X 10.10 - macOS 13

