How to Fix "Hard Drive Read Only" Error on Mac?
Three days ago, I conducted a security update for High Sierra, and then my Seagate external hard drive has become read-only. Does anyone have an idea? I Have 900GB of iTunes on it so a fix with no risk is needed!!! Thank you.
When the external hard drive or flash drive switches to “read-only” mode, certainly, you need to repair the drive. The read-only error allows you to read the files but prevents you from making any changes.
For most macOS users, the condition is difficult. Because the read-only external hard disk does not support a backup. In other words, you cannot copy the files to another read-and-write hard drive.
And one of the solutions to the tricky problem is to format the hard drive on Mac. Your read-only mode will be removed, but at the same time, all your data will be wiped. Surely, it is not an option.
Read the post to find out methods to fix the external hard drive read-only error on Mac without losing data!
Verify the Read-Only Status of an External Hard Drive on macOS
If your files are only readable but not editable on macOS, then firstly, check the hard drive status. It will confirm the actual reason behind the error. Below come five steps:
Step 1: Connect your external hard drive to your Mac device. Make sure the connection is appropriate.
Step 2: Select the drive. You can do this from the desktop by right-clicking the drive or launching Finder to look from the drive.
Step 3: Choose the option "Get Info".
Step 4: Now in the "Get Info" prompt, check the drive format in the file system.
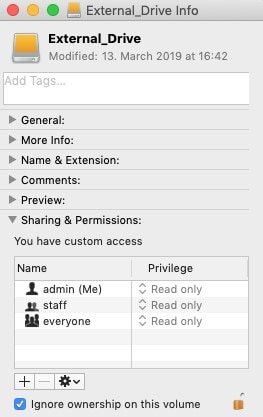
Step 5: Click the button "Share&Permissions", and you will know whether your hard drive is read-only or not.
The Causes of "Read Only" Disk Error
Once you are confronting Mac's external HHD read-only error, the next step is to find out the exact cause, which will allow you to fix the read-only disk appropriately.
The reasons come as follows:
1. Mismatched File System
This error is associated with the formatted filing system of the external hard drive. A default format in the NTFS filing system, which is only compatible with Windows, will not work on macOS.
2. Permission Settings Issue
While operating a Mac device, you need to access some permissions. This permission setup will allow you to access the data in the form of files on the external hard drive. Every OS has its own set of permissions. So if you are using the external hard drive priory with Windows, but connecting it with Mac, you will face the read-only error.
3. Formatting Error
Another important reason can be the hard drive format errors. If your device shows up with a warning message while connecting the external hard drive i.e. device is on read-only mode, It is very sure that it is because of the formatting errors. These errors won't allow you to write on the file.
Three Free Solutions: Resolve External Hard Drive Read-Only Error on Mac
You must be aware of the actual cause behind the disk read-only error. Now you need to find out the most suitable fix to hard drive read-only error.
1 Shift NTFS to APFS - Mismatched File System
Click to Learn Everything about APFS
Aiming to solve the mismatch file system problem, you can shift NTFS to APFS to fix the drive read-only fault. Follow the steps!
Step 1: Launch "Finder" and select the option of "Applications".
Step 2: In the menu, check for "Utilities" and then click "Disk Utilities".
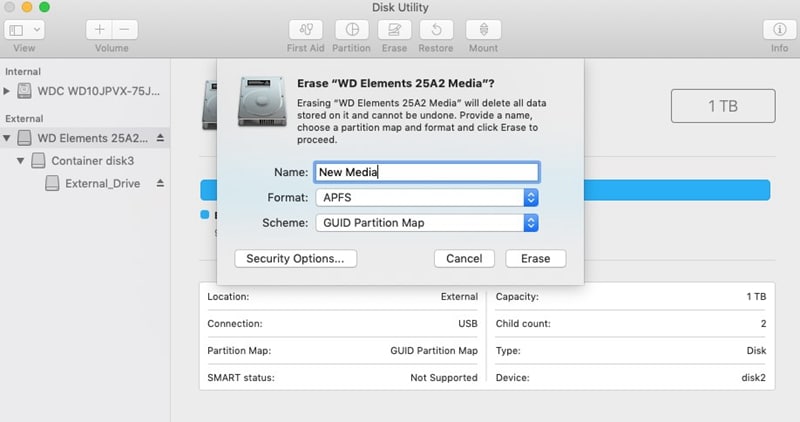
Step 3: Now select the external hard drive and select "Erase".
Step 4: Next step is to format the drive, change the file system, and click "Format" to continue the process.
2 Ignore Ownership - Permission Settings Issue
The second best option is to change some permission settings. It will shift your read-only mode to read-and-write mode on mac device. Follow the steps and complete the process.
Step 1: Click on the storage device (targeted external drive) and select the option "Get Info".
Step 2: In the drop-down menu of "Sharing and Permissions", click on the lock icon and add the password if required.
Step 3: Select the option of "Ignoring Ownership on This Volume".

3 Run the First Aid - Formatting Error
If the read-only error is caused by a formatting error, you are advised to read the following instructions to repair it.
Step 1: Launch "Finder" and then follow the directions i.e. Applications >Utilities>Disk Utility.
Step 2: Now select the hard drive and click on "First Aid".
Step 3: Select the option of "Run" when you see the report is ok.
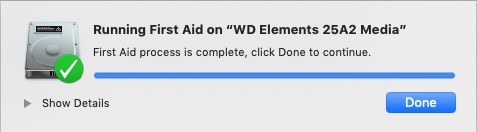
In this way, you can fix both the format error and resolve the issue of the Mac read-only error.
For different causes of the "Read Only" error, I have provided a specific solution. And in the process of repair, you may confront a data loss problem. The next part aims to solve it, you can continue reading to retrieve your formatted data.
Fix External Hard Drive Read-Only Problem without Losing Data
Recover data from the external hard drive on Mac
Wondershare Recoverit for Mac is one of the renowned software that matches your demand for efficiency and convenience. You can retrieve all your files from your NTFS or APFS external hard drive. No matter it is formatted photos, audio, videos, and the like, you can get it back in simple steps. Download it now and launch it on your MacBook!
Step 1: In the software interface, select the option of "External Hard Drive".
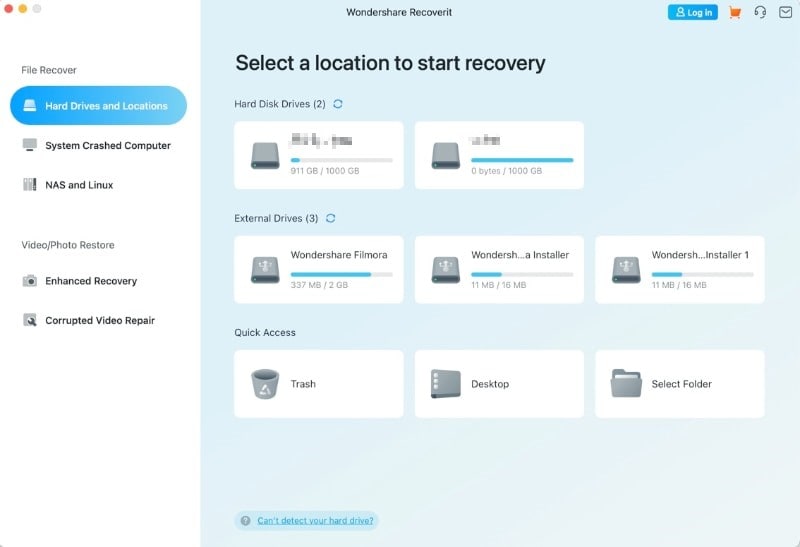
Step 2: Start to initialize the scanning mechanism. It will undergo a quick scan process to restore all the formatted and deleted data.

Step 3: The software will show up all the files in the interface. "Preview" the files. Click "Recover" to regain it.

Step 4: Once the files are recovered, select a location to save the data on your device.
Conclusion:
This article was all about explaining the various reasons and then proposing certain solutions to fix the external disk read-only error on Mac. It stated possible reasons for the error including mismatched file systems, permission setting issues, and formatting errors. For this, you can erase the hard drive, ignore the ownership, or run the first aid using built-in Mac mechanisms. If you lose your data at any step, Wondershare Recoverit software is to help. Hope the article is beneficial for you.
What's Wrong with Drive
- Recover Your Drive
- Fix Your Drive
- Format/Wipe Drive
- Know Your Drive


Theo Lucia
chief Editor