How to Recover a QuickTime Recording – QuickTime Default Save Location
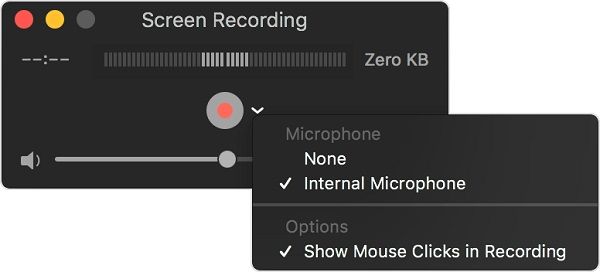
QuickTime lets you record your screen activities and saves them in the QuickTime folder. However, that's not as straightforward as it looks.
Whenever your QuickTime app crashes and shut down improperly, you may fail to save the ongoing recording and lose the unsaved QuickTime recordings. Does QuickTime offer an autosave feature and is there a way to recover the unsaved or even deleted QuickTime recording. This post will give you the solutions.
How to Recover Unsaved QuickTime Recording?
QuickTime has an autosave folder, in which you might be able to find your unsaved video/audio recording when the QuickTime app was stopped abnormally. Here's a quick guide to get your unsaved QuickTime recordings.
Step 1Go to your desktop or open the Finder on your Mac.
Step 2Now use the shortcut Command +Shift+G. You will see a pop-up Go-to box.
Step 3In the pop-up Go-to box, paste the command: ~/Library/Containers/com.apple.QuickTimePlayerX/Data/Library/Autosave Information/
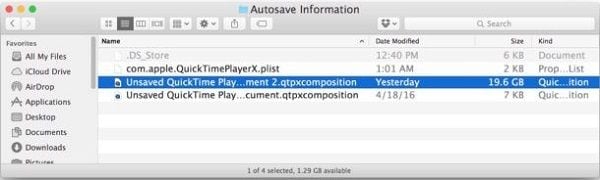
This path will take you to the unsaved QuickTime files. You may come across more than one unsaved QuickTime file. However, you can choose your file by looking at the time it was created. Once you have your desired file, you can save it at the desktop. Just drag and drop it on the desktop to save it. You can also use third-party media players to play unsaved recordings.
Note: The autosave folder doesn't have the deleted and disappeared QuickTime recording. If you deleted some recording files or found a QuickTime recording missing for no reason, try the following solution to recover the deleted or missing QuickTime recordings.
How to Recover Deleted QuickTime Audio/Video Recordings?
Recoverit Data Recovery software can recover your QuickTime recordings that are deleted and disappeared from Trash. It can not only find the deleted recordings but also restore and repair the corrupted QuickTime recordings. Let's have a quick check on the salient features of the Recoverit Data Recovery program.
- The highest real-time success rate for QuickTime recordings;
- Introduction of advanced video repair feature;
- Designed to master 1000 plus file formats;
- Compatible with Mac OS X 10.9 to macOS 10.15;
- User-friendly interface and quick recovery process.
Recoverit How-to Guide
Recoverit is usable for professional and home usage. You are not required to be a computer nerd to recover your QuickTime audio/video files. Recoverit is based on the three-step principle of Select — Scan — Recover.
Step 1Download Recoverit from its official page and install it on your Mac. The installation is an automated process, and you don't need to do anything manually except initiating the installation.
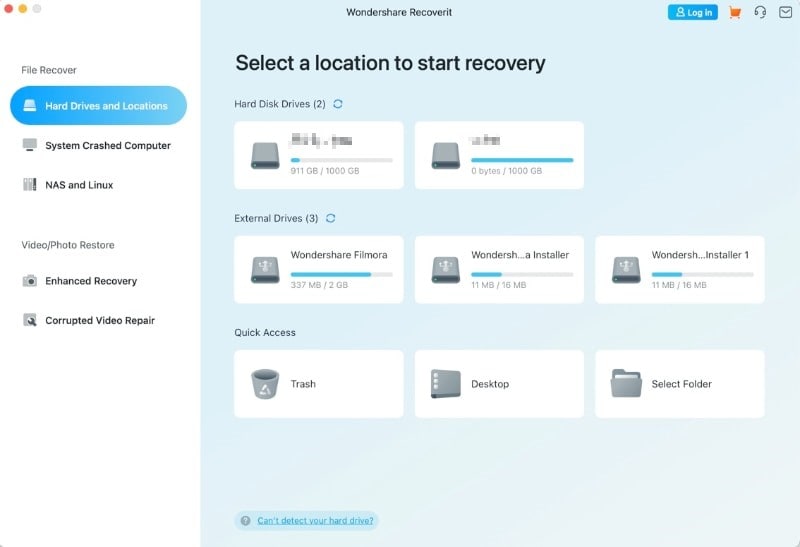
Step 2Select the storage location of your deleted QuickTime recordings. The selection of the precise locations would help Recoverit to filter data quickly. If you are not sure about the storage location, you can choose different drives at the same time.
Step 3Initiate the scan of your selected drive and wait for a few seconds. You can also choose the Enhanced Recovery mode for more accurate results. Now preview the results of the scan and choose audio and video files for restoration. You can also select the customized path to save recovered videos.

FAQ about QuickTime Screen Recording
Here are some of the most repeatedly asked questions from the Mac users about the QuickTime app.
1. Can I Change QuickTime Default Save Location?
Yes. If you are looking to change the location of your QuickTime files, use the following steps. Open the QuickTime app, go to the screen controls, and choose the arrow pointing downward at the right side of your screen. You would see a menu list; from there you can choose your desired location to save your QuickTime recordings.
2. How to Clear Quicktime History?
QuickTime is a media player that records your screen and also lets you play audio and video files. If you want to remove your QuickTime history, follow these easy steps.
- Go to your QuickTime player and open the File menu.
- From the file menu, click on the 'Recent' tab.
- Now select the 'Clear Menu' button. Doing that would delete your recent entries in QuickTime.
3. How to Force Quit QuickTime app?
If your QuickTime has frozen and it's not accepting your command to stop its function. Use the shortcut Command + Control + Esc. This shortcut would force QuickTime to quit and save your recordings. Alternatively, you can also choose 'Force Quit' from the Apple menu. In the Force Quit, you can select the QuickTime app, and the app would force quit. However, you may lose your ongoing recording by this method.
Final Words
If you have lost your QuickTime recordings, there's no need to panic. Mac keeps your unsaved QuickTime recordings in a separate folder. You can access this folder by using the tips mentioned above. These tips are tried by thousands of users and found useful.
What's Wrong with Mac
- Recover Your Mac
- Fix Your Mac
- Delete Your Mac
- Learn Mac Hacks


David Darlington
staff Editor