
Erasing SSD or storage device is crucial if you’ve planned to sell your computer system or just a storage device so that the stored data can’t be recovered or re-accessed. Given this concern, a secure SSD erase process must be executed to wipe out all the data of your SSD.
In this article
Part 1. Does Secure Erase Work on SSD?
The secure erase process isn't confined to HDDs; in fact, it works perfectly on SSDs also, but you might need to implement relatively different approaches to perform a secure erase SSD process. In this regard, various SSD manufacturers also present secure erase utilities; you can easily reset your SSD to a factory state using such handy tools.
Part 2. What Is SSD Trim, and Should You Use It?
If you have a solid-state drive or SSD, then you might be familiar with the significance of SSD trim support. SSD trim is a command that proves to be quite effective in prolonging the SSD lifespan and improving its overall performance. Basically, the SSD Trim command is used by operating systems to inform the SSDs about the blocks that are no longer needed so that SSD can either delete such unrequired blocks or mark them as free to rewrite with new files. Therefore, it is always recommended to enable the SSD trim; you can also manually enable it if it is disabled on your system by default.
Part 3. How To Securely Erase or Wipe SSD?
Though the utilities offered by SSD makers to securely erase SSD are quite effective, but if your SSD doesn't have any built-in secure erase utility, then you can also go for a few other handy methods to securely erase SSDs.
Secure Erase Your SSD Using Parted Magic
Parted Magic is considered one the best application to erase SSDs & HDDs securely. Therefore, here we have explained how to secure erase SSD using Parted Magic in detail; you just need to follow the below stated steps precisely.
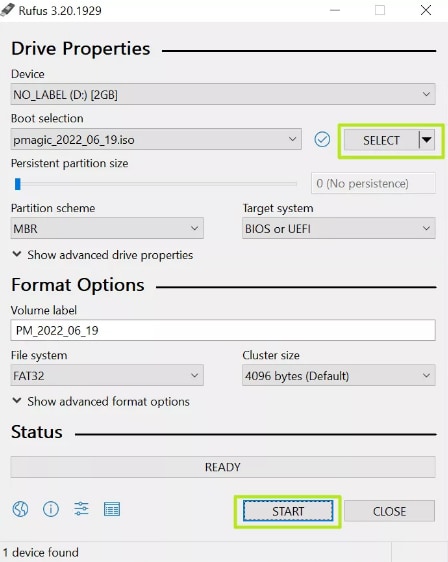
Step 1: Firstly, download the Parted Magic and create a mountable USB flash drive using any reliable utility, i.e., Refus.
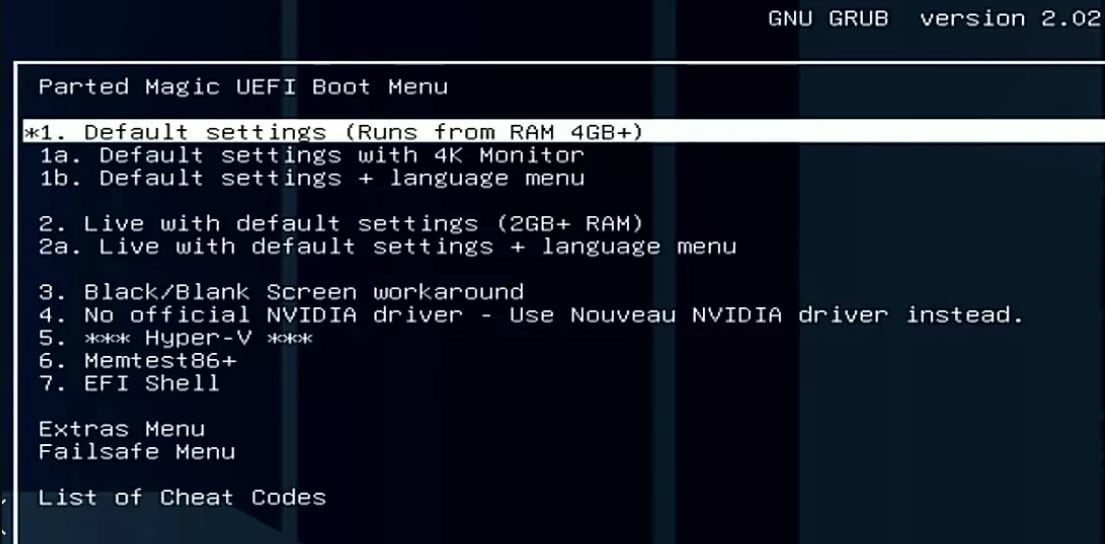
Step 2: Boot the drive on your PC and select the Default Settings option.
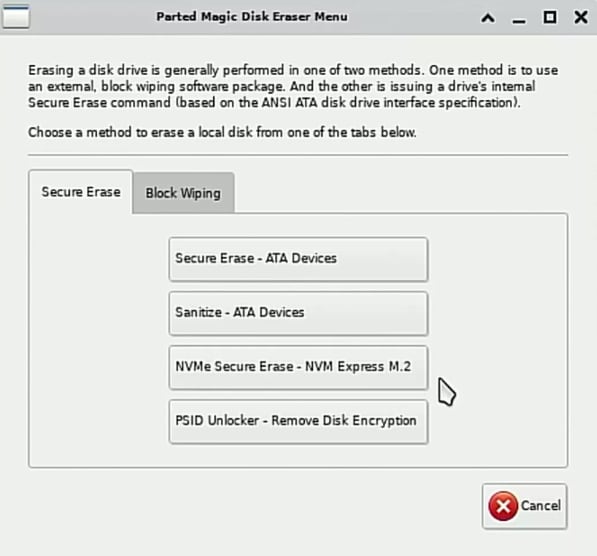
Step 3: Navigate to the Erase Disk app from the appeared Linux desktop environment and launch it.

Step 4: Now, choose the NVMe Secure Erase” option if you have NVMe SSD; otherwise, select “Secure Erase - ATA Devices” if you’ve a SATA drive.
Step 5: You will see a list of available disks. Here the targeted disk may be listed as Frozen, which means it can’t be selected. So, if this is the case, click on the Sleep button. In this process, the screen might blink for a few seconds and then return to a normal state, hinting that the disk is now available in a selectable state.
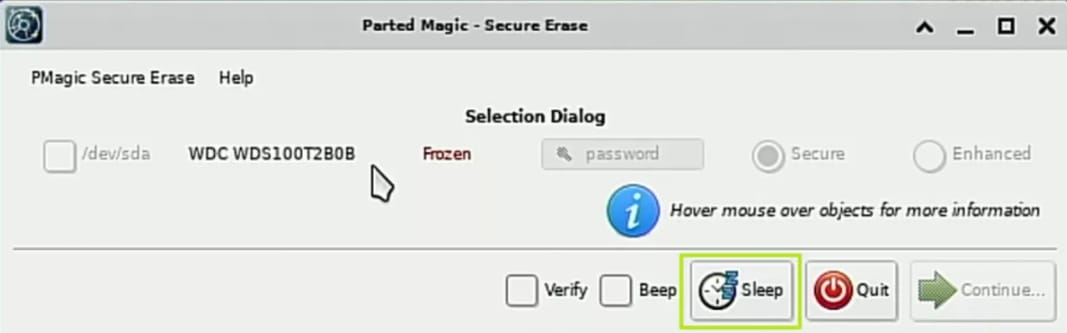
Step 6: Then, choose the drive you intend to erase and click on the Continue button.

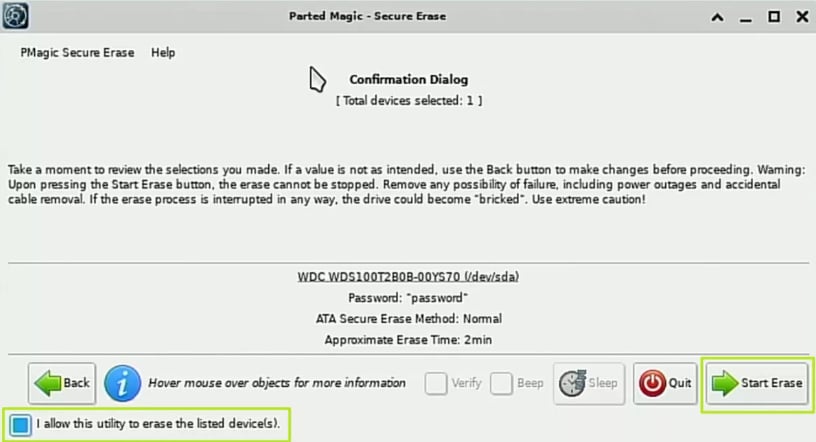
Step 7: Checkmark the option “I allow this utility to erase the listed devices” and click on the Start Erase button.
Step 8: The system might take a few minutes to erase your SSD, and you can easily track the process via the Progress bar.
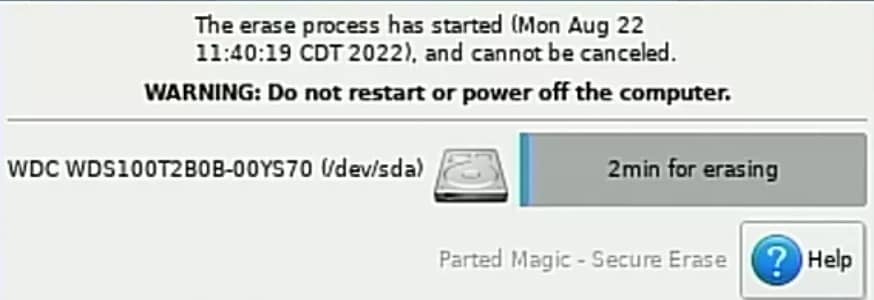
Step 9: Once the SSD erase process is over, Parted Magic will show a message box to notify about the successful erasing of SSD data.

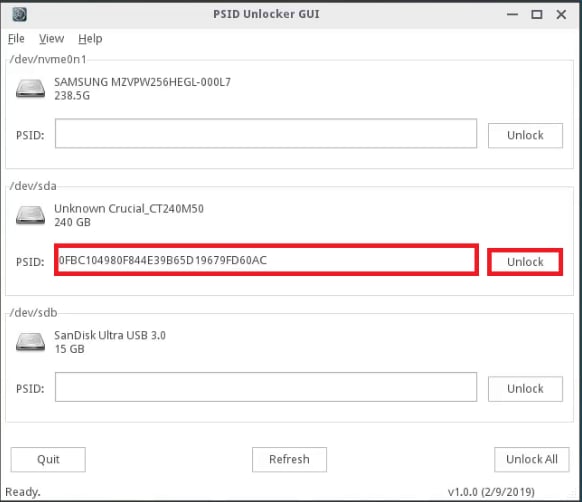
Secure Erase Your SSD Using PSID Revert
PSID revert is another effective approach to secure erase SSD, but note that you can only implement it if your drive is fully encrypted and no other wiping method worked. For instance, if you've locked your SSD drive via Windows 10 pro BitLocker, you can't even access the drive data without using the decryption key, so data erasing is equally challenging. In this connection, PSID (Physical Security ID) Revert effectively unlocks and wipes your SSD. So, for this, what you need to do is:
Step 1: Check the label of your SSD drive to get the PSID. To make the process easier, you can take a picture of PSID so that you can conveniently read it again from there.
Step 2: Enter the PSID in PSID Unlocker GUI (without spaces & dashes) and click the Unlock button.
Part 4. Can Wiped SSD Data Be Recovered?
Although you've wiped or erased your SSD, given the need to reuse or resell it, but if you couldn't take a backup of important files stored on your SSD before wiping, then you might be hunting for a way to recover the wiped files. In such a case, Wondershare Recoverit can assist you in performing successful data recovery.

Wondershare Recoverit - Your safe & Reliable xD- Picture Card Recovery Software
5,481,435 people have downloaded it.
Recover lost or deleted files, photos, audio, music, and emails from xD-Picture cards effectively and completely.
Recover data after sudden deletion, formatting, memory card damage, system crashes, virus attack, etc.
Restore files from 5000-storage devices like digital cameras, camcorders, drones, USB, Drive SD cards, SSDs, HDDs, etc.
Preview files before you recover them. No payment is required if the files are unrecoverable.
Recoverit is Free to try, and paid version to enjoy more.
Operational Steps:
Step 1: Select the SSD drive where you wiped your data, and click on the Start button.

Step 2: The Recoverit will instantly scan the selected SSD drive to dig out the lost files.

Step 3: Once the Scanning process is over, you can preview the scanned files.

Step 4: Select the recoverable files and click on the Recover button.
Pros
Powerful & efficient recovery tool
Safe to use
User-friendly interface
Optional Setup fee
Supports various file formats
Advance Deep Scan algorithm
Compatible with both Windows & macOS
Cons
Size limitation in the free version
FAQs
How do I wipe my SSD before giving it away or selling it?
You can instantly wipe your SSD before selling via the Parted Magic application. But if your drive is encrypted, then you can opt for the PSID Revert method to unlock & wipe it.
What does wiping an SSD do?
The SSD wiping process basically removes the SSD data permanently so that it can't be recovered, especially in a case where you're selling your computer or SSD.
How long does it take to wipe an SSD?
The wiping of an SSD generally depends on the amount of data it contains, but approximately it takes about 15 seconds to erase or wipe an SSD.
Does removing SSD delete everything?
Yes, most SSD-removing methods delete all the data on the drive, i.e., user data, operating system data, etc. In fact, some SSD erasing methods also remove the partitions.
How long will SSDs hold data without manual wiping or erasing?
The SSDs usually come with a lifespan of 5 to 10 years, so data can be stored on them for up to 10 years unless you intentionally erase the drive content earlier.
Conclusion
Whether you intend to donate your SSD or sell your computer, you must wipe or erase your drive beforehand so that your data can't be accessed or reused by other users. Given this concern, we have comprehensively demonstrated how you can readily wipe your SSD in two different ways.
For Windows XP/Vista/7/8/10/11
For macOS X 10.10 - macOS 13

