
Jun 16, 2023 • Filed to: Answer Hard Drive Problems • Proven solutions
Sounds like you? Don't worry! Whether you are working with your old external hard drive or plugging a new one, there is a possibility that the drive fails to show up. Many of us experience it one time or another. It can be due to an upgraded Window, corrupted drive, unsuccessful connection, etc. the reason can be any. This article will help you to fix Toshiba external hard drive not working. We will also introduce you to the reasons that cause Toshiba hard disk not detected/recognized, data recovery with Recoverit, and how to use the Toshiba hard drive.
Can You Fix an External Hard Drive?
Yes! The external hard drive that becomes unrecognizable by your computer can surely be fixed. But before learning the troubleshooting methods, let's first understand what non-working hard drive means and the reasons that make it non-working.
What does Toshiba external hard drive, not working or recognized mean?
You connect the external hard drive to your computer or laptop, and you get a message "USB device not recognized." When you come across such messages, you are not able to view your external hard drive on your computer. Sometimes you even hear the connection sound, but when you look it up on your computer, nothing show's up because the AutoPlay doesn't run.
Why Toshiba External Hard Drive Not Working/Recognized?
The possible reasons for Toshiba hard drive not working can be:
- Missing necessary software or hardware updates
- Corrupt file system in the external hard drive
- Virus attack
- Power failure
- Unsafe ejection
- Unreadable disk structure
- Absence of drive letter
- Outdated drivers
- Partition issues
- Dead USB port
When the drive becomes non-working or unrecognizable, what matters the most at that time is the invaluable data. The chances are high that you lose your crucial data at this moment.
Let's move on to the next part of the solutions.
How to Fix Toshiba Drive Not Working/Recognized on PC
- Check The Port And Computer
- Initialize Toshiba External Hard Drive
- Change the Toshiba Drive Letter
- Check and Repair Toshiba Drive
- Run Windows Troubleshooter
- Update or Uninstall Drivers
- Reinstall USB Controllers
- Enable Legacy USB Support
- Turn on USB Hub and Show All Hidden Devices
- Check for the Windows Updates
Is your 1TB Toshiba external hard drive not showing up on your computer? Can you withstand the loss of the crucial information saved on it? No! The hard drive can become undetectable because of numerous reasons. Fix the problem quickly with the below solutions.
1 Check The Port And Computer
When you connect your external drive through USB to the computer and fail to see it, first try these two quick fixes.
- Check If The USB Port Is Clean
The port on being filled with dust blocks the airflow, which in turn overheats the drive and make it non-workable. Check and ensure whether the ports are clean.
- Check It On Different Ports
Even after cleaning the port if it doesn't show up, try reconnecting it from different ports. See, whether the issue is resolved by it or not. If it does not solve the problem, follow the next solutions for Toshiba hard drive repair.
2 Initialize Toshiba External Hard Drive
The hard drive does not get initialized because of various reasons like MBR damage, connection problem, bad blocks, etc. Initialize it with these steps.
Step 1 - Open the Disk Management and right-click on the non-initialized disk and select "Initialize disk".

Step 2 - Select the partition style and click OK.

After selecting the partition style from MBR and GPT, click on OK to continue the procedure. Wait till the process completes.
3 Change the Toshiba Drive Letter
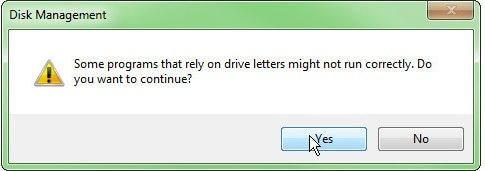
When the corrupted file system makes the Toshiba hard drive not working, you can fix it by changing the external hard drive letter. By doing so, the drive's file system gets repaired. Before changing the drive letter Window will display the warning.
Step 1- Click on Manage, reach the "Manage" option, by right-clicking on the "My Computer" or "Computer" icon.

Step 2 - Select Disk Management that is located under the storage tab in the left bar.
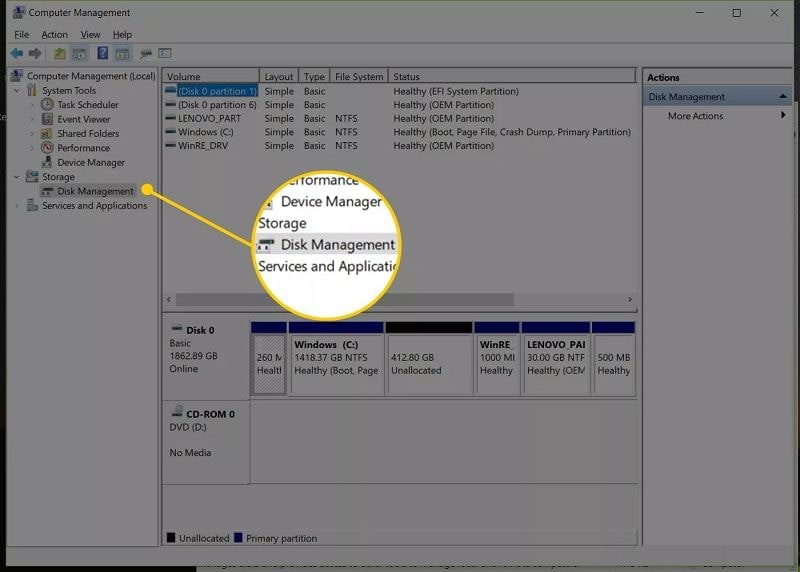
Step 3 - Select the non-accessible hard drive by looking at disk information. Right-click, to change its letter.

If you are thinking that changing the drive letter would delete your saved data on the drive, then don't worry, it won't happen. It will only repair the file system of your hard drive. If Toshiba hard drive repair fails, you can change the drive letter back to its previous one.
4 Check and Repair Toshiba Drive
Sometimes the external hard drive is not visible in Windows Explorer, but if you check it in Disk Management, it appears there. Check it with the below steps:
Step 1 - Type disk management in the search bar and open it.
Step 2 - Right-click on unallocated space, select "New simple volume" and click on "next".
Step 3 - Select volume size and then "next".
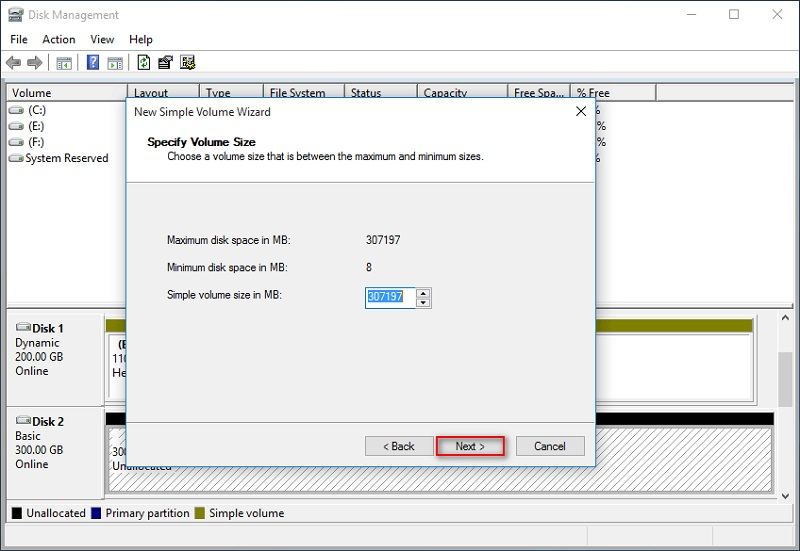
Step 4 - Assign drive letter and path and move to "next" to finish formatting.
Step 5 - After the format finishes, click on "next" and then hit on "finish" button.
Step 6 - Wait till the operation completes after a click on "finish" in the "new simple volume" window.
5 Run Windows Troubleshooter
There are various troubleshooters in windows. These are designed to automatically solve the problems of the computer by swiftly diagnosing them. While working on your computer, whenever you come across a problem, it would be better if you initiate to resolve it with troubleshooting. Begin Toshiba hard drive repair with Windows Troubleshooter by following the below steps:
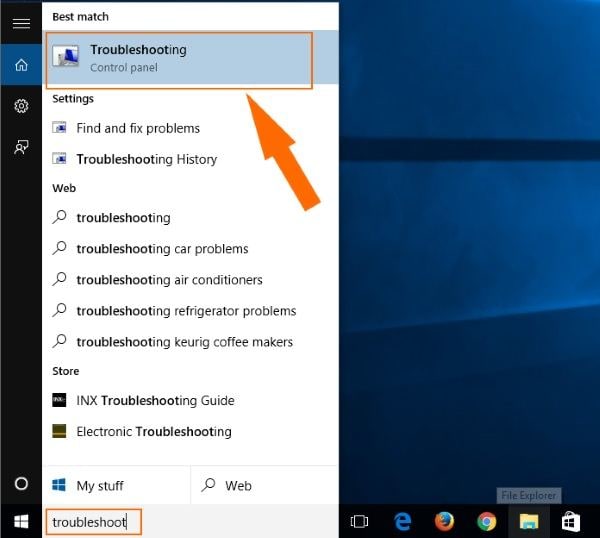
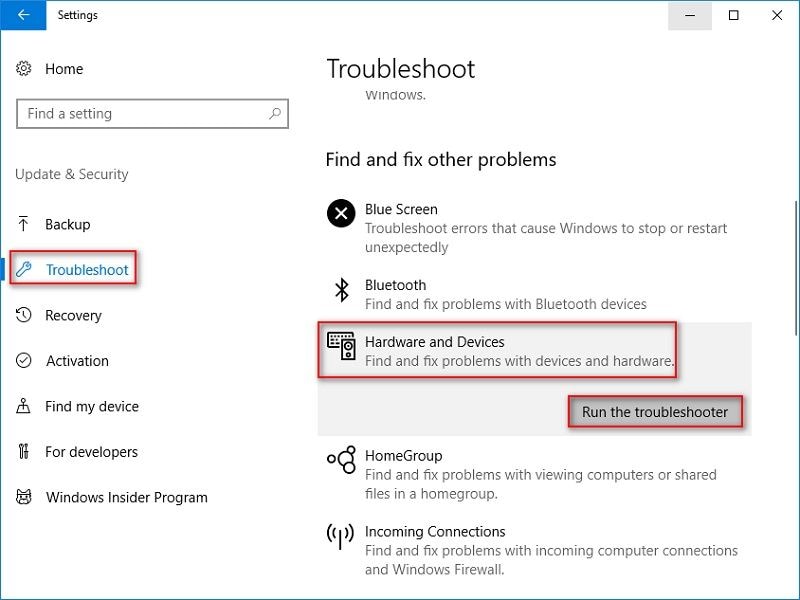
Step 1 - Find troubleshooting by typing Troubleshoot in the search bar.
Step 2 - Find "Hardware and Devices"
Under the tab- Hardware, and Sound, you will get "Find and fix other problems." Click on "Run the troubleshooter." Once you select it, the troubleshooter will start looking for problematic areas of hardware and devices.
Step 3 - Click Next To Fix the Issue
Wait till the detection completes and Window makes you available with the list of issues found during scanning. Click next after selecting the problem that you want to fix.
A troubleshooter is a useful tool that helps to solve the problems of the Window.
6 Update or Uninstall Drivers
If you are working with outdated drivers on your Window, then also the external hard drives become non-accessible. Update the drivers quickly with these steps:
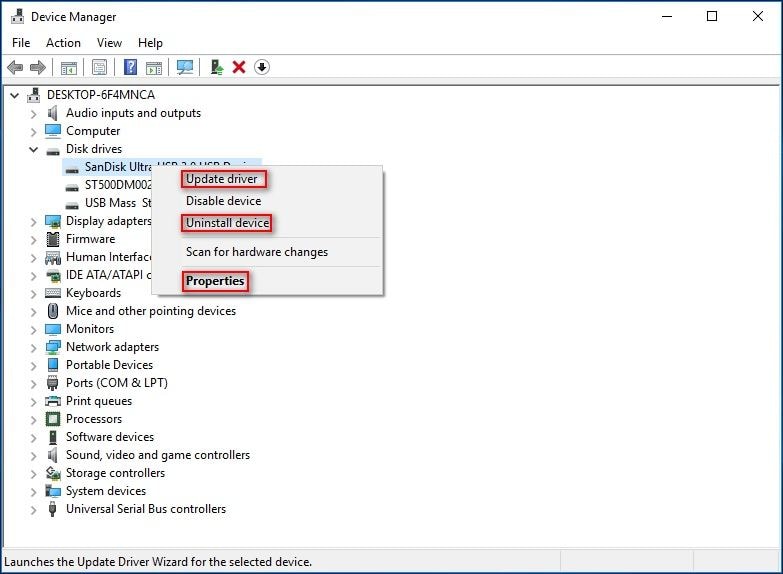
Step 1 - Open device manager and expand disk drives.

Step 2 - Update Driver Software
Right-click on the Toshiba external hard drive, and from the available options, select update driver. If updates are available, it will show up, else select on uninstall. Follow the instructions as guided by the wizard to update the driver of your hard disk.
- The updated driver helps to diagnose the problem and solve it that is caused by a corrupted or outdated driver.
- If no update is available; with an uninstall device feature, you can uninstall the Toshiba external drive. Remove the drive from the system and try to reconnect it again after a minute. When the disk becomes unstable or corrupt, this can resolve the matter.
- From the properties, you can diagnose the problem a little further.
7 Reinstall USB Controllers
If your previously installed USB driver has become corrupt and is preventing the hard drive from showing up, fix it with these steps.
Step 1 - Select Device Manager
Type device manager after clicking on the start button, and select it.

Step 2 - Expand the Option- Universal Serial BUS Controllers
Click on the icon in front of "Universal Serial BUS Controllers" to view its options. Look for your hard drive that must be marked with yellow exclamation.

Step 3 - Update Driver Software
Update the software for the one that is marked in yellow. Right-click on it and from the given options, click on the Update driver software. Select "Search automatically for updated driver software." If there is no update, right-click it and select uninstall from the available options.
Step 4 - Go to Action Tab
From the device manager window, go to the "Actions" tab and select the option "scan for hardware changes." You can see the USB port now. Try to reconnect the hard drive to the computer through the USB port, and you will be able to see it on your computer now.
8 Enable Legacy USB Support
When the Toshiba external hard drive was not recognized by Windows 10, it can be due to Legacy USB Support Disabled. Enable it with these steps.
Step 1 - Restart your computer and Enter the BIOS utility by pressing the corresponding button.
Step 2 - Move to the "Advanced" tab and select USB configuration.
Step 3 - Click on Legacy USB Support and set the option to "Enabled."
Step 4 - Exit from the page and save the respective changes.

9 Turn on USB Hub and Show All Hidden Devices
If the USB selective suspend mode is enabled on your computer, it suspends individual port without causing any effect to the other drives. The selective suspension is useful in laptops as it conserves the battery. Enable the USB hub with these steps.
Step 1 - Type the power plan in the search box and select "Choose a power plan".
Step 2 - Click on "change plan settings" and then move to "change advanced power settings".

Step 3 - Expand the "USB settings" and then expand the "USB selective suspend setting".
Step 4 - If it is enabled, click on disabled.
Step 5 - Click on "Apply" and then "OK".

If the device is still not visible go to type devmgmt.msc in the run dialogue box, open device manager, and select "show hidden devices" by clicking on a view.

10 Check for the Windows Updates
Sometimes the older version of Windows becomes incompatible with the external hard drive and thus fails to show it up on the computer. Updating the Windows to the latest version can help resolve the matter. Do it with the following steps.
Step 1 - Go to Windows Update and Check for Updates.
Write windows update in the search box and find it. Click on check for updates to view the latest version. Now, wait till it is checking for the updates.

Step 2 - If any of the updates are available, it will provide you the link. But, if it displays system is up to date, it signifies that there no updates currently for your system.
Step 3 - If updates are available, click on "download and install" to install them.
Step 4 - Windows will install the updates now automatically. Once all the updates get installed, if "restart" is scheduled, restart it when prompted to finish the update process.
How to Fix Toshiba Drive Not Working/Recognized on Mac
If you are a Mac user and unable to see your Toshiba external drive on your MacBook, fix it with the following solutions.
1 Try fixing the problem with the basic troubleshooting steps
- If the external hard drive is not powered correctly, it will not show up on your desktop. Try connecting it to the USB hub that is externally powered.
- The USB cable that you are using might be faulty, try to connect it with the Mac by using a different USB cable
- Join the external hard drive to the computer from the various other ports of the computer.
- Rebooting Mac can also fix the issue, as it clears the Mac operating system's memory and gives it a fresh start.
These primary troubleshooting steps fix the problem mostly. If the issue persists, follow the next solutions.
2 Enable External Hard Drive on Desktop
When you connect the external hard drive to the computer, generally it shows on the desktop, Finder and Disk Utility. If you are unable to view it there, check the settings of Mac.
Step 1 - Click on Finder and go to Preferences.
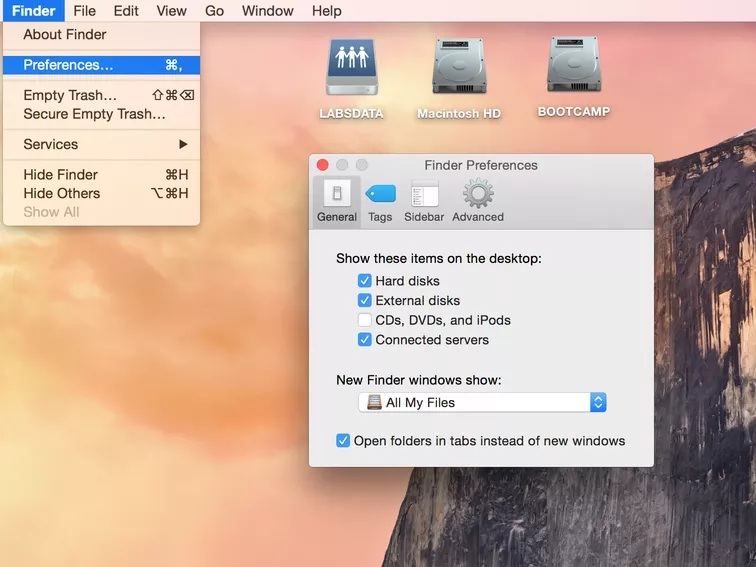
Step 2 - Under the "General" tab, look if "External disks" is checked or not.
If it is unchecked, enable it by clicking on the box in front of it.

This will help you to show your Toshiba external hard drive on your desktop.
3 Fix in Disk Utility
Disk Utility helps you to resolve disk and disk-volume related problems on Mac. Solve it with first-aid in Disk Utility.
Step 1- Reach Disk Utilities with the path Utilities -> Disk Utility.
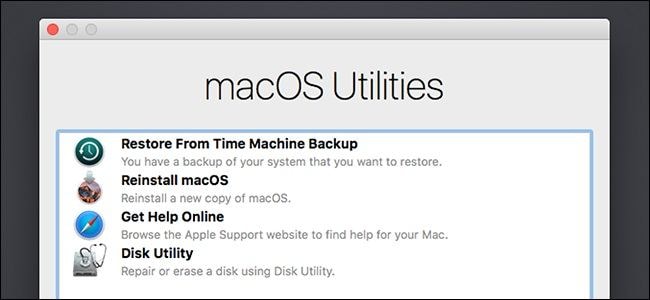
Step 2 - Select Unmounted Toshiba drive and go to First Aid.
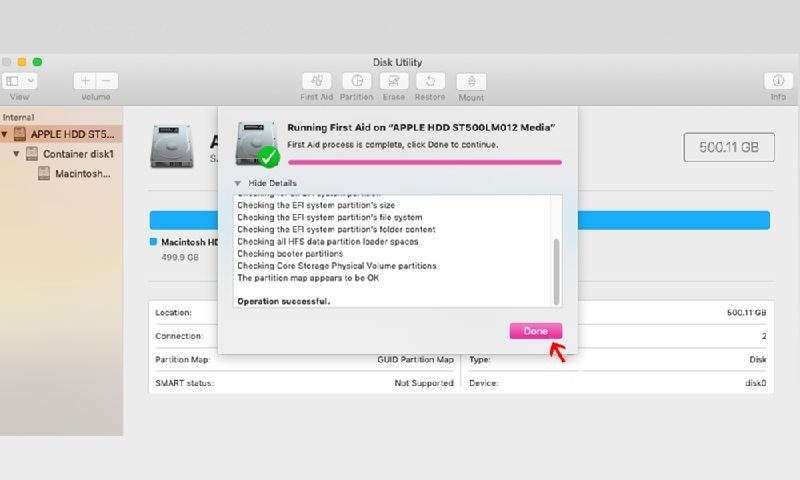
Wait until the repair and verification process completes.
4 Reset NVRAM
NVRAM is non-volatile random access memory. The memory will keep the stored data irrespective of whether the power is off or on.
Step 1 - Shut down Mac and restart it. Press Command, Option, P, and R keys all together when you hear startup tune.
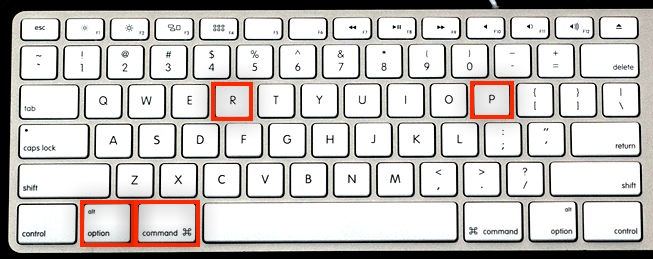
Step 2 - Release the keys when you listen to the startup tune for the second time.
This resets the NVRAM. Check, the Toshiba hard drive should have shown up.
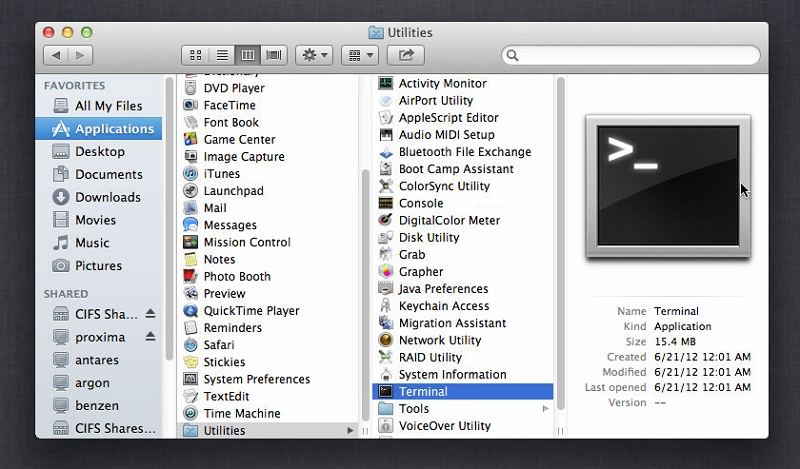
5 Fix it with Terminal
If the system information of your Mac recognizes the Toshiba external hard drive, but still it doesn't show up, remount the hard drive with Terminal.
Step 1 - Open Terminal
Reach terminal through the path – Applications -> Utilities -> Terminal
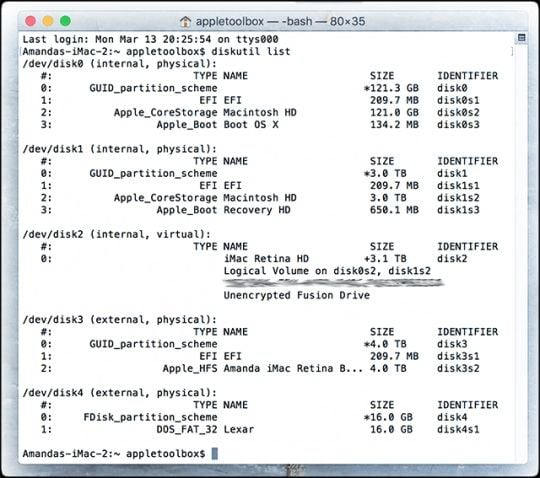
Step 2 - Open it and type diskutil list
The command makes you available with the list of all the attached drives and available volumes. It would be better to check with this command that whether the drive is connected to the computer or not.
Step 3 - Look for the section /dev/disk* (external, physical)
disk* is a physical disk identifier. Here the * denotes the number that is assigned to the disk. Note it down. If the disk is partitioned, the number after the letter "s" symbolizes the partition number.
Step 4 - Type diskutil info disk*
In place of * add the number that is assigned to the drive. You will get the complete information of the drive here like its size, manufacturer name, removable or unremovable, etc.
Step 5 - Type diskutil eject disk *
Once the Toshiba hard drive gets established by your Mac, eject it by using Terminal, with the above command. Write the disk identifier number in place of *.
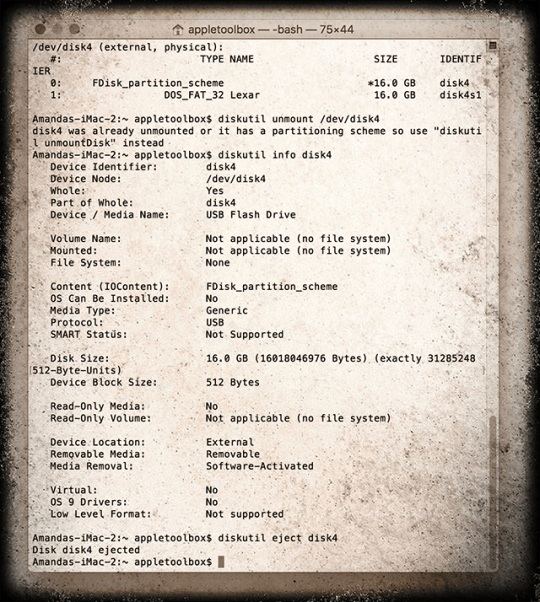
Step 6 - Again type diskutil list
You need to type the command again to view whether the Toshiba hard drive is gone from the list of attached drives.
Once the drive is not visible in the list, remove it physically from your Mac to reinsert it. The drive should have mounted, and you can work on it usually.
If you are unable to execute the Terminal commands, then grant full disk access to it.
How to Recover Data from Hard Drive After Format?
After trying the solution explained above for Toshiba hard disk repair, if at any step you find the data is lost, what will you do then? Well once the Toshiba hard drive repair is successful, you can easily recover the lost data with Recoverit data recovery software.
Taking a backup of your device before performing any repair steps is always suggested. Still, if you can't manage to take it, Recoverit data recovery software will help you.
Wondersahre Recoverit Data Recovery Software
With the highest recovery rate, Wondershare Recoverit data recovery tool is the leading software to recover lost data. It supports more than 1000+ file formats and can easily get back deleted or lost data from storage spaces like internal and external hard drive, desktop, SD card, crashed computer, etc.
Launch Recoverit after downloading to gain access to your lost data.
Step 1 Connect the Toshiba External Hard Drive
Before beginning with the recovery procedure, connect your hard drive with the computer first. Ensure it is viewable in the drives list.
Step 2 Select the External Hard Drive
To get back the deleted data, select your hard drive from where the data is lost. After choosing the location, begin scanning by hitting the "Start" button.

Step 3 Scan the External Hard Drive
Recoverit begins the scanning with the all-around scan. As per the size of the file, the scan takes a few minutes to hours to complete. It even enables you to pause or stop the scan anytime according to your convenience. So when the scan is running, if you find your lost data, stop the scan over there to save your time that will go in completing it.

Step 4 Preview and Recover Data
Before recovering the images found during the scan, you are allowed to view the files before. See them by clicking on them and then on the preview button. You are also made available with the information like modified date, path, name, and size of the file.
Once you preview the files, confirm after selecting the targeted files. Complete the procedure of recovering files by clicking on "Recover" and save data on a different path.

It is necessary never to save the files retrieved during the scan on the same location from where you lost them initially. If you do, it will increase the chances of data being overwritten and also lead to permanent loss of data. So, always save files at a new location after recovering them.
How Do I Use a Toshiba External Hard Drive?
Most of the Toshiba external drives are compatible with computers that have a USB port. You can use the drive to store any type of folder or files and even store backup of your computer or laptops.
- The hard drive can last for longer than its lifetime if maintained well. Keep the device free from dust to maintain proper airflow that prevents it from heating. Clean the hard drive regularly to maintain it in good working condition.
- Keep the hard drives password-protected to avoid data leakage. If you encrypt the hard drive, it will prevent any data loss or leakage even when you lose your hard drive.
- When you set a password to protect the hard drive, it would be beneficial to set a hint for the set password to let you remind your password. The hint and the password should be easy for you and difficult for others to guess.
- Defragment the hard drive, because of continuous saving and deleting files the disk becomes fragmented. It creates gaps in the hard drive, where files don't fit is left vacant. Fragmentation slows down the hard disk speed. It is also advisable not to defragment the device too often, as it reduces the hard drive lifespan.
- Remove duplicated files from the hard drive. Duplicate files increase disk usage and fragments which impacts the health of the hard drive.
Closing Words
Working on the external hard drives is very beneficial as the portables drive allows you to work at your comfort at any place. However, the disk can become inaccessible on Windows or Mac computers because of various reasons. So, the next time whenever your Toshiba external hard drive becomes non-working or unrecognizable by your computer, try fixing it with the methods discussed above.
It is necessary to always take a backup before trying any repair steps. Somehow if you are unable to have a backup and your files got lost during the disk repair, recover your lost information with three easy steps of Recoverit.
What's Wrong with Drive
- Recover Your Drive
- Restore formatted drive
- Recover undetected drive
- Retrieve WD drive data
- Get files from external drive
- Wiped data can be recovered
- Fix Your Drive
- What if drive not showing up?
- Hard drive won't boot? Fix it
- What if a disk unallocated?
- Deal with hard drive crash
- Repair disk & recover data
- Format/Wipe Drive
- Know Your Drive


Theo Lucia
chief Editor
Generally rated4.5(105participated)